Here's the page I created, documenting Mr T and I moving in together......have a little click if you want to see it in better detail:
Here's a list of the products used:
Lily Bee This & That "Pretty Fabric"
Lily Bee This & That "Milk Bottle"
Lily Bee This & That "Linens"
Lily Bee This & That "Teacup"
Glitz Design Whatnots from the Love Games range
The little keys in the MME Bits and pieces pack were absolutely gorgeous - perfect for the theme of my page. I added a rhinestone to the centre of one of the rosette flowers to make sure my page was nothing short of blingtastic in every corner!!
As well as stamping the chair from the MME stamps straight onto my page, I also stamped it onto good old shrink plastic a couple of times to make these cute and unique chair embellishments.
I used a Prima Marketing doily stamp on a couple of the patterned papers, cutting it at different sections and layering them on top of each other to create the circular embellishment you can see in the photo below.
I used the Glitz Whatnots cards for my journalling - the heart on became a tag with my writing on the back, and the alphabet one the pocket for it. You can see how I cut a slit into it to hold the tag here:
You might notice the black border on my pictures on the layout, called a vignette. I added them in Photoshop. I find they add a bit of drama to the photos and help emphasise the main subject, and usually use them on my blog posts too. A few people have asked me how I create them, so I thought that I'd write a little tutorial.
First of all, I must admit I can't confess to be a Photoshop Expert, what I know I've learned through tinkering about. I like to tinker when it comes to computers!! So this is how I create vignettes on my photos - there might be an easier way to create them out there, and if you have any tips - we'd love to hear them so please let us know in the comments. There are ready made actions available, but I have found that they don't always give a result I'm happy with - the same settings don't aways suit every photo. By following these instructions you can get a vignette that has the depth and colour that you want for each individual picture.
I'm using Photoshop CS4 which I got recently, but part way through I also describe how to do it in Photoshop 7 which I used to have - I'm pretty sure that the instructions may be applicable to other versions too. Failing that, or if you don't have any version, there is a free piece of software available called GIMP which is very similar to PS and in which these instruction may work (or very similar steps).
OK, so here's how to create a subtle vignette on your photos, one I call "Soft Round Vignette" lol:
Step 1: Open your picture. In the layers menu in the bottom right corner, right click the word background, and then select duplicate layer from the menu
Step 2: This box should pop up on your screen, if you want to rename the layer you can type something else in the box, but there isn't really a need to. Press OK.
Step 3: You should now see in the little layers menu both your original layer, and the duplicated one. Click the little arrow where it says normal,
and from the drop down menu that appears select multiply. Your picture should darken slightly.
Step 4: Choose the elliptical "marquee tool" - this can be found in the tool marked by a dotted circle or square.
Draw your circle where you want the focus of your picture to be - remembering that everything on the outside of the circle will be the slightly darker vignette.
Now here's where the instructions differ slightly in the newer versions of Photoshop:
Step 5 for CS4:
Right click on your photo to get the following pop up. Select refine edge:
Now, in the following menu, you firstly need to have a look at the little icons that I call the "knots" at the bottom - each allows you to preview the changes you are making to your pic in a different way. I personally find choosing the second one (circled in the pic below) is the best as the red mist makes it easy to see how your final vignette will appear - how much of the picture it will be covering and so on.
You change this by moving the sliders up and down until you are happy - the good news is that once you've done this the once, each time you go back into this menu the settings are as you left them, which makes it quick and easy if you are adding vignettes to a whole bunch of photos. When you are happy with the "red mist" preview, press OK.
Step 7: Good news for those of you with older versions of PS - step 7 is much quicker and easier!!
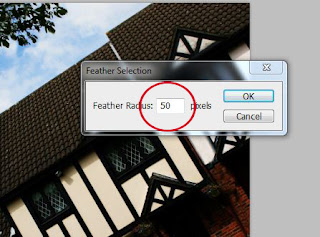
Right click on your photo, and select "feather" from the pop up menu:
OK.
Ok, whatever version of PS you have, we're now all back to singing from the same hymn sheet!
Step 8: Press the backspace button on your keyboard- this deletes the selected area inside the circle, leaving the shadowy outer frame.
In the layers menu, you should be able to check this by seeing the little snapshots - the copied layer should look like it has a hole in the middle!
Step 9: Nearly there now! From the layers tab at the very top of the screen, select merge down. This "squishes" (very technical term there!) the vignette you have just created onto your picture.
You can check this by looking at the layers menu - just one snapshot should be visible now.
Step 10: You are finito! Save your handy work! You may wish to "save as" if you want to keep your original unedited picture (without the vignette) too.
So here's a look at comparing the original photo with one with the Soft Round vignette we've just created, the subject of the photo is subtly made more the main focus by the darkened areas around the edges.
Sometimes though, a more dramatic look is required. That's easy! Here's how I make a darker more noticeable vignette that I call "Black Fringe Vignette" (yep - I come up with the best names for stuff!!).
Follow the steps just as above, but when you get to Step 3, select "difference" from the drop down menu. This will pop a completely black mask over your photo. This time, choose the rectangular marquee tool to make your selection, leaving a slim border all around. Then continue with the rest of the instructions as above.
Here you can see the original photo, the soft round vignette and the black fringe (which I just added on top of the soft round one) to compare the looks. Depending on my photo and the effect I want, I'll use either one of the vignettes or both together.
I hope that seems clear and easy enough to follow, it really is quite easy to do and after a couple of times running through it you'll be a dab hand. You can also record it as your own action, so that you can perform it with a couple of clicks of a button - if anyone would like instructions on how to do this - give me a shout in the comments section :)
I hope that you enjoyed my first post and that you'll be brave enough to give digital vignettes a go - save this to your favourites and have it to hand while you work on your photo.
Be sure to pop back TOMORROW, as I have a couple of pretty and quick home decor makes to share :)
Love, Nat xxx


 la
la


6 comments:
Certainly a touch of drama! I am loving all these little tips and tricks! Thanks for giving instructions and for a lthe lovely LO! Jill x
Thanks Nat - be prepared to see vignettes on a load of my pictures now!
Stunning LO Nat, and thanks for the tutorial. I'm going to go and put some of those papers in a shopping basket right now... lush lush lush!
xxx
Stunning page Nat, loving those papers! Thanks for the great tutorial too xx
Fab layout hun xx I am into vignettes at the mo too :)
Great tutorial :) Love me a Vignette I do lol. And I love, love, love that layout. The colours are lovely and all the little details are so pretty xx
Post a Comment