Tuesday 26 July 2011

~*Lazy Sunny Days *~


Hi all, Gems here. This month I got to to work with the gorgeous Sassafras – Sunshine Broadcast range. The colours and patterns are so pretty I couldn’t wait to cut into them and get creating. 

One thing I always admire on other people's scrapbook pages is the look of handcut patterns from patterned papers, however, I rarely have the time (and patience if I am honest!) to sit and intricately cut out complex  flowers etc. from sheets of paper. So Sassafras ‘Foldies’ provide the perfect product to imitate the look of handcut without the work. 

The ‘Foldies’ come as a 12x12 sheet, and have numerous designs of different shapes and sizes. 


The flowers are die-cut and you simply pop them out from their 12x12 sheet, fold them where specified and voila, you have perfect flower embellishments in seconds! 

I created the following layouts all using Sassafras - Sunshine Broadcast patterned papers, sweet treats stickers and journaling stickers along with the ‘Foldies’ to embellish my layouts. 

[Beautiful Innocence]

For this layout I wanted the focus to remain on the photo of my daughter, so I kept the design pretty simple. I simply mounted my photo on a piece of the 'Kindle' paper which I then stuck onto my background paper, 'Static'. I then used the Foldies along the left hand side of my photo which I finished with some pretty self-adhesive pearls in lemonade.  

 [Please Click to View Larger]


[Sweet and Lovely]

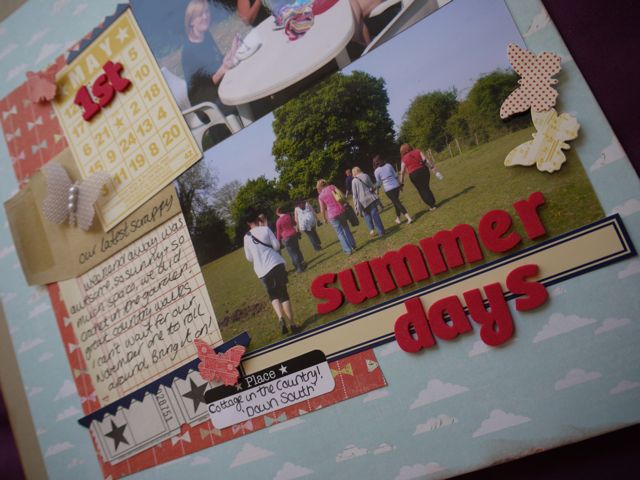
This layout of my girly playing with some bubbles in the sunshine seemed to suit these papers perfectly. Instead of using an alphabet to create my title, I simply used one of the Sweet Treats stickers.

  [Please Click to View Larger]


[First and Last Day of Reception]

For this layout I used the gorgeous 'Golden Hour' patterned paper as my background. I then mounted my photographs onto a strip of 'Beaming' and one of the co-ordinating journaling tags.
I then added one of the strips from the shaped bottoms of the patterned papers, and also added the alphabet strip from the 'Golden Hour' paper. I used Adornit Tiny Alphas for the first half of my title and Sassafras alpha for the rest. I embellished the layout using the Sweet Treats stickers and Foldies

  [Please Click to View Larger]


 So go and check out the gorgeous Sunshine Broadcast range by Sassafras and the extremely useable 'Foldies' which have just been restocked! Thanks for stopping by :) Love Gems xoxo

Monday 25 July 2011

Spin the Wheel

Its a bit of a quickie from me today, all my stuff has been boxed up and only just unboxed as I've been in the middle of a house move.  But just before the move, I was playing with Studio Calico's State Fair collection :-


I'm still into misting as you can see, however, it has come out a little dark on the photo, so when I find which box my camera is lurking in, I'll get a better shot overall.   The lovely butterflies are also from the State Fair collection as are the chipboard alphas.  For the wheel, I cut up some strips of spare paper, ran them through the ribbler and curled them up.

Sorry for the short post, but I'll be back again soon with some more stuff using this range. :)

Thanks, Vanessa x

Friday 22 July 2011

{Love}

Jen Naulls

I admit it, I have a bit of a weak spot for themed papers. Be it Halloween, Christmas or Valentine's, I do love so many of the ranges that come out, but I'm often left with lots of stash and not enough themed photos to go with it. I know many scrappers overlook the themed sections of shops, but you'll often find that collections include many versatile prints in cute colour combinations, without being covered in hearts or snowmen or bats, and the B-sides are always worth a look too!

For this post I challenged myself to use a set of themed papers in both a conventional and non-conventional way, and I have to say I'm thrilled with how different the pages are. Most of my papers and embellishments for these pages are from the  
range - I adore the quality of American Crafts products, and love that they always have lots of coordinating embellishments. 

Remember you can click any of the pictures in this post to see them bigger. 

The 'stick-to-the-theme' layout


I really went for it on the love theme for this page! I used a wedding photo, so straight away I'm right in the intended zone of these papers with all their hearts and lovey sentiments. Sometimes I think we all need a bit of the mushy love stuff in our scrapbooks!


I focused on lots of layering on this page. Before I stuck anything down I asked myself 'can I add another layer to that?' and often I found that just backing an element with an additional cardstock border added a huge amount of depth and interest to the page. I scuffed the edges of most of the things on this page with my fingernail, for a little bit of extra dimension. 
For the border made with the mini hearts paper, I cut a 12x1.5" strip, then punched it to a scallop shape on one edge (using a Fiskars scallop sentiment border punch), then I very roughly folded & pleated it (you might need to stick a few of the pleats down with a small dab of glue otherwise it has a tendency to pop up off the page!).


I used four different kinds of Thickers on this page:
Sticking closely to the love theme, my title is simply 'Love, love, love'. This title should be sung to the tune of 'All you need is Love', I can't seem to say it any other way! 
I added a subtitle by simply using one of the dimensional sticker sentiments layered up over a tag and a couple of other little elements. Premade embellishments like this are great for layering.


I always try and think of the 'visual triangle' when I make my pages, and so for this layout I created three clusters of embellishments, all based around tags, with a punched butterfly or two for good measure. By adding a triangle of embellishments you pull all the elements of the page together, and allow the eye to flow naturally over the page. This is my go-to technique whenever I am stuck on a layout - creating 3 small embellishment clusters around my photo.

The 'outside the box' layout


This page really has nothing to do with Valentine's, or weddings, or love (although I did add one teeny tiny heart for posterity!). This page is all about how I'm a country girl at heart, and although I have lived in big cities (Leeds and Norwich), I much prefer a quieter pace of life surrounded by fields and forests. The photos were actually taken at the end of April this year on a girly scrapbooking weekend - we took a lovely walk on the Saturday afternoon to take in the sights, including these miniature ponies. These are just pictures that seemed to suit the theme of my layout, and I could lay my hands on easily!


I used a really simple misting technique to liven up the plain background sheet that I used as the base of this page. Simply place a doily (some cute doilies available in the shop here) on the page - I placed mine into the bottom left corner, adhering it in the centre with a small amount of repositionable adhesive (Herma is great for this job!). I chose a mist that was a similar shade to the background, but a darker colour , and sprayed all over the doily mask. Then simply allow the mist to dry and remove the doily leaving you with a beautifully intricate pattern upon which you can layer up your photos and embellishments.


I found plenty of lovely papers in this collections which weren't covered in hearts - some stripes, floral and scroll papers caught my eye for this particular page. I inked and scuffed the edges of everything for a slightly muddy, country look!


Even the elements of a collection which at first glance appear very 'in theme' can be used on out of the box pages. I used some of the tags here - ones with stripes and scrolls on fitted the layout fine, and altered a couple of the dimensional stickers by removing the little heart topper and replacing it with a threaded button. 

So there we have it, two very different layouts from one themed collection. 
I challenge you (just for fun!) to use a themed collection for a page on a totally different subject to the intended theme - I'd love to see what you do, so leave a link in the comments section!

Tuesday 19 July 2011

Another funky floral idea


Still playing at making embellishments with the Sassafras Sunshine Broadcast range, I thought I would try to convert a quilting design I found online into paper flowers, I'm fairly pleased with the result of this one and it's most likely the simplist flowers you could ever make yet still achieve such a great 3D effect.


To make these flowers..(excuse my lack of knowledge on the name for this type of flower) cut or punch out some small circles anywhere between 1" to 2" inches depending on the size you want them to turn out. Ink the edges for more definition and simply fold over both sides into the middle to create the cone shape.
Stack up the cones by tucking them into each other.


It really is so simple..

Products used on this page are;

Sassafras Sunshine Broadcast Mini Alphas-Goldenrod, Banner Flag Stickers. Papers are Goldenhour, Static & Kindle.
Fabric Thickers.
Zva Creative Pearls.
Prima Lace.
Sherbet Buttons.

Monday 18 July 2011

Brighten up your rainy day.. with some Sassafras Sunshine Broadcast


Wow, I am totally in love with anything Sassafras and the latest range Sunshine Broadcast is keeping me well and truly busy.

I always find with Sassafras papers that there as so many lovely elements that I need to cut out and use, so this time I challenged myself to try and make some embellishments of my own and you just can't go wrong with a few lovely flowers on your layouts.


For this layout I chose to use WRMK Stitched Cardstock. I created my layers using Sunshine Broadcast; Beaming, Kindle & Static papers.. and a sheet of Bazzill Dotted Swiss which is now in the sale at only 25p a sheet..Bargain !.
To embelish my layout I used a sheet of Sunshine Broadcast Flag Banner Stickers, Sherbert Fizz Buttons, Patchwork Fabric Thickers and some pretty Prima lace.

So.. let me show you how I made my flowers for this page.

Select some of the cut off strips from the bottom of the Sassafras papers, I have used three strips for my flowers. One 12" strip for each flower.

Fold each strip concertina style inbetween each scallop and in the opposite direction at the highest point of each scallop.


Over lap the end and glue well to create a bangle.


Push down towards the centre - the straight edge,against a table or hard surface.


Whilst holding it together, flip it over and glue a small circle scrap of card to the back.. hold in place until the glue dries. (very fiddly)


When the glue is fully set, use your fingers to open out the petals of your flowers and attach your choice of centre to the flower.


Check back tomorrow to see what other flowers I have made this month.

Claire xx

Saturday 16 July 2011

Rocket Age Card collection

As promised, here are some quick tutorials for the cards I made using the left overs from my page in my last post. Being a scrapbooker first and foremost, I often find it hard to scale my papercrafting down to a card-sized piece of work. Hopefully, these six cards will help you see it doesn't have to be complicated. Keeping things simple is the key, and these cards are each made in just five steps!

In addition to all the supplies I listed yesterday, I also used a sheet of the Bo Bunny Double Dot Journal paper in Buttercup, and a sheet of Jenny Bowlin Playdate Sunny Day paper.

I tend to make my cards in "ordinary sizes," (that being A6 or square) for two reasons; one they are easy to whip up out of card stock scraps and A5 card, and secondly the envelopes for these sizes are easy to get hold of. The Shop stocks a fantastic array of envelopes in many different sizes, including the very popular Kraft finish, so whether you are already a budding card maker or just beginning to dabble, be sure to check out the stock here.

I think everyone gives a little groan when they need to make a male card.....we're all so used to reaching for pretty scallops, butterflies, flowers, ribbon and lace so it can be hard to make something  without throwing in a spot of the regular "girlie" embellies we all love. However, when a fantastic line like Rocket Age comes along, male cards can come together really well!
Here's what I'll show you to make today:

Click on each of the images to get a closer look.

Banner Card
  1. Cut a complementary piece of cardstock to size to act as a matt for your design (I chose an orangey-red colour).
  2. Layer strips of Black Hole, Incoming Transmission and All Systems Go to create the background. I used a scalloped scissors to create a decorative edge along the bottom of the All Systems Go.
  3. Create three flag shapes from the All Systems Go paper by cutting rectangles and snipping triangles shapes from the ends of each.
  4. Punch three number 16's from the Jenny Bowlin paper and add them to the flags (you could choose any other suitable number from the paper, or of course make your own), then string them together using some of the bakers twine. Add to the card using 3D foam, and tie the ends of the string into bows.
  5. Add greetings from the Word Stickers sheet.

Reach For the Stars
This would make a great male Good Luck or Congratulations card.
Sometimes, an idea which worked well on a scrapbook page can be translated to a card, like I did here. I layered up the same patterns as I used for a background on my Geek layout, copied the embellishment cluster (minus the spaceboy head, as that would have been to crowded for a card), reused the mask I created to mist on some stars and hey presto! A hand written greeting, some rhinestones and a tab sticker from the Word Stickers sheet and a quick card was complete!

Giant Leap
  1. Layer vertical pieces of both sides of All Systems Go next to each other on a cardstock matt.
  2. Use the star border sticker from the Word Stickers sheet to cover the paper join.
  3. Place the "expedition no." sticker from the sheet vertically in the right hand corner, and add the recipients age to it (I used some Thickers from a past kit - cards are great way of using all those numbers you always have left over on an alpha sheet up!)
  4. Take the circular journalling sticker from the sheet and add it in the left hand corner.
  5. Cut the Neil Armstrong quote sticker up and rearrange parts on your journalling spot to read "that's one giant leap for" then add a "U" to the end from your alphas. Finish with a robot hand cut from the Captains Log paper.
Birthday Captain
  1. Using the Buttercup journalling paper as a matt, add a piece of Incoming Transmission as your back ground.
  2. Add the "Blast Off" border sticker from the Word Sticker sheet vertically to the right hand side of your card, use a stamp to highlight the recipients age. I used a marker stamp from this set.
  3. Use a circle punch to punch three circles from different papers, add them to your card before doodling some rings and stars on them.
  4. Hand cut some spaceboys from the Captains Log paper and add some Glossy accents across the helmet to give it a glassy appearance. When dry, add them to the card.
  5. Add a tab sticker to the top of the card (adding a hand written or stamped greeting) and the captain sticker to the bottom.
Incoming Transmission
  1.  Cut a piece of Incoming Transmission as your background, and layer a selection of adverts from the Black Hole paper along the bottom.
  2. Add a strip of punched stars along the top of the adverts using a complimentary coloured card.
  3. Hand cut three robots from the Captains Log paper, and stick them along the top of the advert strip. I stuck the left-most robot flat to the card, the second one using one layer of 3d foam, and the third using two layers of foam to give the effect of depth and them marching forward. 
  4. Create the flag using a small piece of the rear of the Incoming Transmission paper folded around a cocktail stick, and add a hand cut laser gun from the Captains Log paper to it. Stick in place using 3d foam.
  5. Matt the "Incoming Transmission" sticker from the Word Sticker sheet onto a bit of the Buttercup journal paper and use 3d foam to stick it to the bottom right of the card. Complete the card by adding some doodling to the punched stars, and a border all the way around created from dots and dashes to give a Morse code effect.
 Into the Great Unknown
  1. Using a piece of dark blue card as a matt, add a piece of the rear of the Captains Log pattern as your base.
  2. Add a strip of Incoming Transmission across the card, using a pinking shears to give a decorative edge that's not too feminine.
  3. Use a 1" circle punch to create a circle from the Buttercup journal paper, and add the rocket emblem circular sticker from the sheet on top. Add the recipients age on top of this - I used some left over red glittery Thickers, again from a previous kit. Stick your embellishment to the left side of the card.
  4. Create ticket shapes using the Captains Log paper. I carefully positioned my paper in my die cutting machine over a ticket die to make sure I cut the "exploration" and "journey" words out, but you could simply use a ticket from your stash as a template and draw around it on the patterned paper then cut it by hand if you don't have the die/machine etc. Tuck these just under your embellishment.
  5. Pop the Into the Great Unknown sticker onto a bit of the dotty side of the All Systems Go paper (I cut the rocket part of the sticker off) and add it to the card with 3d foam. Use the bakers twine to give a packaged-up effect, bringing it from all edges of the card and tying it into a bow in the centre.
And there we have it - a collection of six male cards made from the scraps of one layout! I hope this has inspired you to get creative with your scraps, and even to be really adventurous and make some cards for men, which we all find difficult! Reach for the stars people! ;)

Happy crafting, and be sure to pop back soon to see what the lovely talented Claire has to share with you :)
Nat xxx

Friday 15 July 2011

To infinfity.......and beyond!

It's always hard to sum up your own scrapbooking style, but if pushed I'd have to say I was all about the pattern. Combining patterns and colours is my favourite part of the creative process, and I often use five or six different patterns on one page! I just love me some pattern!

When I saw the fabulous Rocket Age collection from October Afternoon (wouldn't Buzz Lightyear just love it?!), I immediately fell in love with the warm colour tones and retro patterns, and knew it would be a perfect collection to record my other half's technological (i.e. geeky!) occupation and interests! So I quickly snapped up a whole bunch of the papers, as well as some matching embellishments, and set about using them on a single page. Where as lots of people are nervous about using lots of patterned paper on a page, I have the opposite problem and am terrified of plain cardstock! So I thought I'd show you how I combined seven papers to make this page:

Geek
 (give it a little click to see it more closely!)
The products I used are as follows:
October Afternoon Captains Log paper
October Afternoon All Systems Go paper
October Afternoon Black Hole paper
October Afternoon Incoming Transmission paper
October Afternoon Return Voyage paper
October Afternoon Rocket Age Word Stickers
WRMK Out & About Grid Lock paper
Bo Bunny Double Dot Designs Journal Paper in Denim
"Divine Twine" in Orange
Jilly Beans "Sugar Picks" decorative pins in orange & turquoise
Adornit Tiny Cardstock stickers in Whoopsy Red
AC Chit Chat Puffy Thickers in Chestnut

  • I began the page by creating my own sheet of background paper by layering strips of the orange side of the Return Voyage paper, rear of the Incoming Transmission and the Grid Lock paper together. I then added a vertical strip of the Captains Log paper from top to bottom.
  • I mounted this onto the Bo Bunny Journal paper (if you've not seen these papers yet - check them out here, they are fab and have a great texture and weight). I like to mount my page onto cardstock as it gives the page a nice border, creating a "finished feel" and keeps the focused eye within the page. Before mounting it, I gutted a piece from the centre to use for my journalling. 
  • I created my journalling in MS Word using a type writer effect font, and created a list of all the geeky things Mr T is in to. I printed it on to ordinary white copier paper first, then using repositional Herma, I carefully placed the gutted piece of cardstock over the print (holding it up to the window to help me see more clearly) to make sure the writing would be exactly where I wanted it, and stuck it down. I then ran this through the printer again, and peeled the copier paper from the back. I used a note paper effect border punch down one side and then attached it to my page. You can see the journalling printed on the paper here:
  • I then added further matts by cutting "adverts" that I felt were fitting to Mr T's personality and interests from the Black Hole paper.
  •  I created an embellishment cluster to the left corner of the photo. I made a star by cutting the shape from pizza box cardboard, misting it with brown mist, and then peeling back a little of the top layer to reveal the corrugation underneath. I then inked it and added a little sticker from the OA sticker sheet.
  • To finish the cluster I added a little spaceman cut from the Captains Log paper, two of the Sugar Pick pins and a wooden button, through which I tied the twine and created a big bow, tying the ends right around the photo matt.
  • I used the alphas to add my title - the white space in the photo leant itself to having wording applied directly to it so used the tiny red alphas for this.
  • To decorate the right hand of the page, I cut a robot from the Captains Log paper, added a word sticker, and used a little star punch to create a mask to mist some brown shooting stars on to the page.
  • Finally I created this little tag effect at the top of the page using some stars cut from the All Systems Go paper and a sticker from the Words pack.
Of course, using a huge amount of pattern paper on each layout means one thing - tons of left over scraps! I usually put them into a storage box with good intentions of using them for other projects, never to see the light of day again! But with Rocket Age, I immediately knew I would definitely use up my left overs to make a series of cards for men - something I usually struggle to make but these papers gave me loads of inspiration to get cracking!

My "scraps" from this project went really far, and I made six cards! I could have kept going too if time was no object!

Here's the collection I made - check back tomorrow for a picture of each card along with a tutorial for each - the perfect project for the weekend!
Thanks for stopping by today,
Nat xxx

Sunday 10 July 2011

July Challenge

What time is it? It's challenge time!
This months challenge was set by Rachael Elliott before she went off to pastures new. We know how you all love your sketches, so Rachael created this one for you to have a play with.
Here is Rachael's LO, celebrating her 30 + 10 birthday.

Rachel created this fab LO to record a photo from her uni days.

Sarah played along this month and created this gorgeous LO using Lily Bee This and That papers.

And Nat used the sketch to produce this stunning card.


This month we have increased the prize for the monthly challenge to a £20 e-voucher. That's right.... not 10, but 20 whole smackeroonies for you to spend in the shop. AND this isn't a one off, the prize will be £20 each and every month. Aren't we good to you?
So for your chance to win all you need to do is use the sketch to create a card or LO, and pop a link to your work in the comments box of this post. You have until the end of Sunday 31st July to get your entry in, and we'll be back on the 8th August to announce the winner.
I said it last month, but I'll say it again... You've got to be in it to win it!
Good luck.

Lou
xxx

Friday 8 July 2011

Challenge Winner.

Last month I posted the challenge monthly challenge to use clothing as inspiration for your card or LO.
We had 4 lovely and very different LOs entered, and would like to thank those that did play along with us. Unfortunately there can only be one winner and the Design Team was unanimous in it's decision.
Scatty Chick.... come on down!!!

We all loved how you hand drew the design from your bag to create your own background. And it's great to see you scrapping about yourself too... this is something I know I need to do more of!
Congratulations on your well deserved win. If you email us at lianne@sarahscardsltd.com we will get your e-voucher code sent out to you... stash shopping here you come, wooohooo!!!!
The July challenge will be up in a couple of days, so make sure you come back soon.

Thursday 7 July 2011

Jenni Bowlin- Part 2

Hi guys, its Rachel again, thank you so much for your nice comments, nice to know our blog posts are inspiring you.

So i thought i would swing by and show you my final layout, using fabby Jenni Bowlin products.

On this page I have only used a bit of patterned paper and concentrated on the products.


I am all about the square photos at the minute, for those of you with a iphone, these are taken using the Instagram app and then printed at photobox using the shrink to fit option.

I tend to start most pages with a piece of kraft somewhere because kraft is awesome, again I just played around with where things should go (briefly, I am not a patient person).


Originally I just had one bingo card but then I thought i would step it up, I know I am too precious with my things, just use them you will only go off them if you keep them for years. Use it or loose it!

I few tickets always help too, i wanted to add the heart one just because i could but decided to raise that on 3d pads, now I have always used cheap foam pads like Poundland cheap, and thats fine and all until I found these.


these are American Crafts Foam Dots these are awesome, they are so much higher (is that the right word) than my other ones and they are all cute useable sizes. Adhesive isnt much fun to buy but you use it on every page!


There you go all raised, i added my trusty memo pad paper to tell my little tale. 


I added a few more cute things like the bunting stickers, the wiggly line stickers (technical term) and some cute bakers twine and a cute butterfly to finish it off.


So thats all from me this month, I hope it has inspired you to try some of the products, I would love to see what you do with them, link them up and I will go and visit.

Thanks for stopping by

Rach x

Wednesday 6 July 2011

Who loves Jenni Bowlin?

I do!

Hi all Rachel here, this month i have been working with some gorgeous products from Jenni Bowlin.

I have a very busy style of scrapping and believe more is more (for me), I just adore Jenni Bowlin embellishments.

I hear lots of people say that a page isn't finished because they don't have enough 'stuff' on it, so here I am showing you how i used some fab 'stuff'.


This is my bundle of the embellishments I have used

Bingo Cards (a personal favourite) 
Stickers (cheap and effective)
Tickets (love love love)
Memo Book (fab for journalling)

So there you go, there are loads of other things you can use, you can find all of it here 

On the first page I wanted to show how you can make a page without using a lot of patterned paper.

I used a tiny bit of MME but simply layered up the embellishments, when I thought it was done I added a few more for good measure.


A quite new product that i love are these Flag Banner Stickers


I've used them on a good amount of my pages lately, especially for dates etc, I have added a couple of cute butterflies here, another easy inexpensive way to add interest to your page. 


I have so many of these tickets, i love them but i am so tight with them, I have never used this many on a page before, its always one just sat at the corner of a photo, but i thought if I was going to show you how to use them i may as well go all out. I love the strips of them, and especially as its man loves woman given the theme of my page.

This page I thought i would show how i used a little of the embellishments and more patterns paper. I used MME again Good day sunshine - girl I love this collection, maybe because it has the cutest cloud paper in ever.


I pulled 2 6x4 photos out of my giant pile of photos and started positioning things, all quite random with no real idea where it was going, (this is how i tend to scrap)


I stuck the papers down and layered the photo on top.

I had a quick check of my Iphoto to check what month this actually was (shocking i know)


I counted it as May! 

I added a few more embellishments


Good old tickets, and my trusty Memo Pad, i love these note books, they appear on most of my pages, they are great to journal of just get some key facts.


The colour on the actual pages (they have about 3 of each type of page) is very subtle, I have the Red and Yellow, you also get some cute stickers in the back. I think these are officially my favourite.


and there you have it


cutest calendar bingo cards, I have been using these for my Document 2011 (this is my May page btw)


some cute Delight Thickers and a good helping of butterflies and its done..

I hope that has given you some inspiration to go and try some of the Jenni Bowlin embellishments, I will be back soon with my final page.

Thanks

Rachel x