Monday 29 April 2013

You CAN paint

Hi Lovelies. What have I got for you today ?

I love the soft paint effect such as that from American Crafts Dear Lizzy Lucky Charm and Amy Tan Yes Please ranges. I can't paint but I know I can try achieve something similar.

I decided to paint some "watercolour" circles.  I said watercolour but the same effect can be achieved by using a number of mediums such as mist (applied with brush), gelato or watercolour pencils.  In my case, I had some gelatos in the colours I wanted to hand so I use those.

I started by drawing some circles around bottle top lids on a scrap of white card. I coloured them with gelato ( much like watercolour pencils ) before taking a wet brush to them. I added a few more lines roughly around each circles before I cut them out. I also drew and cut out a few circles from patterned paper.

 
I wanted some sparkly buttons but I didn't have any in the right colours so I made some.  I started with some clear buttons, add a layer of diamond glaze to the top and sprinkle extra fine glitter on top. After letting them dry properly for over a day, this is what I have.


I also added glitter to some foam pad circles.  Cut a strip out, remove the top and sprinkle glitter.

 
This layout is about a trip to Paris and I wanted to handwrite Paris.  I did this on a scrap piece of cardstock that I then cut out. I know a lot of people probably have an electronic cutter that makes this part easy but sadly, I don't.

 
The next step is to start building up the layout. I started by laying out the circles on a piece of background cardstock. I added some machine stitching to some circles for added definition. I also added some die cut foliage.

 
I am using these, one of the pockets to contain my journaling. Some of the pockets are transparent and with the transparent alphabets, you can see through to the text that I will place in the pocket.
 
 
I stuck them down on the background cardstock.
 
 
I typed up some journaling using my vintage typewriter.  There are some spelling mistakes as my fingers sometimes move faster than my brain but rather than going the Tip-Ex route, I decided to embrace it.  I don't know how typist of old managed without word processors and spell checks!

 
After adding the photo and the glittered buttons, foam pads and my handwritten Paris, this is a close up of what I finished with.
 
 
There you go, my layout this month, Paris on wheels.
 
 
That's all from me today.  I hope you are enjoying The Spring. I hope that has given you the inspiration to get a paintbrush out.
 
Blogged with love by Ifa.

Friday 26 April 2013

Just because

Hi Tracy here with a couple of layouts I've created using some of the Little Yellow Bicycle- Just Because range.

On my first layout I have layered up some of the flowers from the paper crafting kit. I decided to use only a small piece of paper and some of the clear cuts to embellish my page.


 On my second layout I have used some of the velum tape stickers in the top left of the page and across the bottom also. I layered up a few patterned papers, added the clear cuts clouds, some Studio Calico chipboard stars, two pearl pins and a length of twine.


I love all the designs that are included in the clear cuts pack which I have photographed for you here.


There's loads of fab elements in the paper crafting kit too.

Wednesday 24 April 2013

Pebbles Basics Banner & Twine Kits

Hi everyone, Jen G here. I mentioned in my last post that I had stumbled across the Pebbles Basics Banner & Twine kits at the very end of the Retreat in March. I am quite sure that these kits would make gorgeous banners for parties, decorations etc, but I wanted to see how I could use them on layouts. I still had Studio Calico papers on my desk so I continued to use them along with some of the super versatile Pebbles Basics papers.
The pieces in the triangle banner kit are a great size for A4 layouts. I used one here to draw the eye to the main photo block of the layout. The two stars were punched from the centre of a couple of the banner triangles and I put the rest of those triangles to one side to use on further projects...
like this one:
By punching the star from the centre of the triangle the negative of that punch could be used as an element on the page.

As well as triangles the kit comes in a flag banner shape. I chose the powder blue kit. Each kit, by the way, has several different print designs in it. There is large spotty; small spotty; chevron; flowers; check and a ledger paper style. For this layout I positioned two banners behind the photo with Studio Calico chipboard arrows overlapping them to draw attention to that snowball my son was aiming at me!

I positioned the banner on this page behind the photo also, but this time I cut it in half first so that I could elongate it to peak at at both sides of the photo. Again I was being pelted with snow at the time the photo was taken!

On this next page I stepped away from Studio Calico and went for some Basic Grey Knee Highs and Bow Ties instead. I used one of the banners as a template to cut the same shape from the Basic Grey paper then I layered them up across the page. On the top left of the page I cut a banner in half and layered it back together so that it appeared to be a thinner banner shape as the base layer of the element.

The colours and patterns on these banner kits are really versatile. I still have heaps of them left to use too. Each of these pages also features another versatile favourite of mine - the Simple Stories Sna@p! icon stickers, letter stickers and typeset stickers.

As always, we would love to hear your comments and see links to your work.
Have a great day everyone!


Monday 22 April 2013

Lucky Charm

Hi, Vanessa here with my post for this month.  I've used the Lucky Charm papers from American Crafts to make a few little projects.

Firstly, I've used the 4 x 8 page protectors to start an album for last years holiday.  This is a bit different from me, A4 is my usual scrapping size, but I need a bit of a change without going back to 12 x 12.  I've incorporated a bit of embossing and found a way to use some washi tape (go me!) which I just get a total mind-block with.


My second little project is CD envelopes.  But, with a difference.  I always have receipts lying around everywhere making a mess of the place and I need to keep them until I've done my "housekeeping" budget calculations.  I also put vouchers in different places with the intention of using them when I next go to the supermarket etc.  But, have a terrible habit of forgetting where they are and miss the deadline date.


I now have handy little envelopes that I can keep them in once place, nice and tidy!  Now I just need to train my brain in remembering that I've got them!

Finally, a scrapbook page with some paper rippling (have you still got your rippler from the Sarah's Cards retreat a few years ago?) and a couple of cards.

 
Thanks for looking.

Vanessa xx

Thursday 18 April 2013

Buttons

At the last retreat, I assisted Ifa with her lovely class which incorporated clear buttons. Some were idly sat on my desk space, when a bit of paper shuffling resulted in one becoming stuck on a torn scrap of washi tape, which inspired me to use it to deliberately create custom patterened buttons for my pages this month.

I'll make no apologies for bringing you pages made with snowy photos that I took back in January, in April - as I'm sat here with the rain lashing at the window and the wind howling around the walls, I could easily be forgiven for thinking we were in the deep depths of Winter anyway!

My papers this month are from the Amy Tan "Yes, Please" range.

Here's my first page:


You can just see a couple of my washi-covered buttons in the bottom right hand corner.  Here's how I easily created them in moments:

1. Pop a strip of washi tape, sticky side up, on to your work area, and pop a button on top. Easy! As you can see on the right, you don't have to stick to just one design of tape on your button. Mix it up! Go wild! Dig in to that washi!
For larger buttons where your chosen tape isn't wide enough to cover it in one go, pop one small piece of tape over half of the button, then simply tear another small strip and marry up the pattern on the other half, as below (you can just see the button in the picture underneath the tape; I joined the tapes along the button holes):
2. Burnish the tape on to the button firmly with your thumb and finger, and then trim away the excess tape from around the edge. Using a pokey tool or a pin, push through the button holes and remove the tiny scraps of washi tape from inside. I preferred to push through from the back as it ensured that the rest of the tape wasn't accidentally lifted from the button in the process.
3. And ta'daaaa! You have your own custom buttons using the pretty washi tape that we all love and hoard!!
The semi-transparent nature of washi lends itself very well to the buttons and create a lovely effect when popped over layers of paper or photos as you can see a portion through the design; I popped some onto a photo here to illustrate this:

The particular tapes I have used here are the gorgeous ones from MME's My Girl, Notable and Unforgettable triple packs.

Here's a close up of them on my page:
For their mat I used a slice from the chevron arrow sheet in the Dear Lizzy die cut sheet pack, and utilised the bits I popped out else where on my page - you can see some below the title (above) and some at the top of the page:
The "Phrases" veneer from Studio Calico's Sundrifter range are lovely for adding that extra bit of detail to your pages - I love the wood-burnished look of the fonts on them and the pack contains a huge array of phrases and symbols.

Here's the second frosty page that I used my washi buttons on:


This time I used some of the Phrases veneer to make a little weather-forcast style snow symbol:
 I used some of the gorgeous little Amy Tan puffy stickers as sub-headings for my journalling and others such as the hearts, flowers and arrows to add interest around both of my pages:
I didn't opt for a title per se on this layout, but instead grouped a strip of one of the Amy Tan papers that had a definition printed across it along with some pretty die cuts from the Dear Lizzy Lucky Charm die cut pack to convey the message:
So that's me for April - I am sat with my fingers crossed that we will have defrosted and I will be able bring you some warm, sun-shine filled pages for May! .......Well, a girl can dream ;)


Tuesday 16 April 2013

{Divided}

Jen N here today, with a little insight into my process for creating pages with divided page protectors. My scrapbooking style has changed a bit in the last couple of years - I still love to create 12x12 pages, but the albums that we find ourselves looking back at the most are my Project Life style albums, with day to day memories and details. Each year the way I've created my album has changed a little, and I think I've now found my "happy place" for this style of memory keeping. I wanted to share with you how I go about creating a set of pages, and also show you a few fab new products available in the shop.

This style of scrapbooking needn't just be for Project Life style albums either. Divided pages can work really well alongside full sized pages, especially for events for which you have lots of photos, but don't necessarily want to dedicate loads of 12x12 pages to.

For each spread of pages that I do, I make myself up a supply kit of products. I find this step really speeds up the process for me, as I'm then not choosing from all of my papers & embellishments for every little detail. First up, I choose a colour scheme, and papers to go with that. I tend to choose one or two multicoloured papers first, and then select a few single or dual tone sheets that match. I pick a few full sheets from my newer papers (on the left) and then dig into my scraps basket and pull out some older pieces to mix in (on the right).
This selection includes papers from Basic Grey Knee Highs & Bow Ties, Dear Lizzy Lucky Charm, 
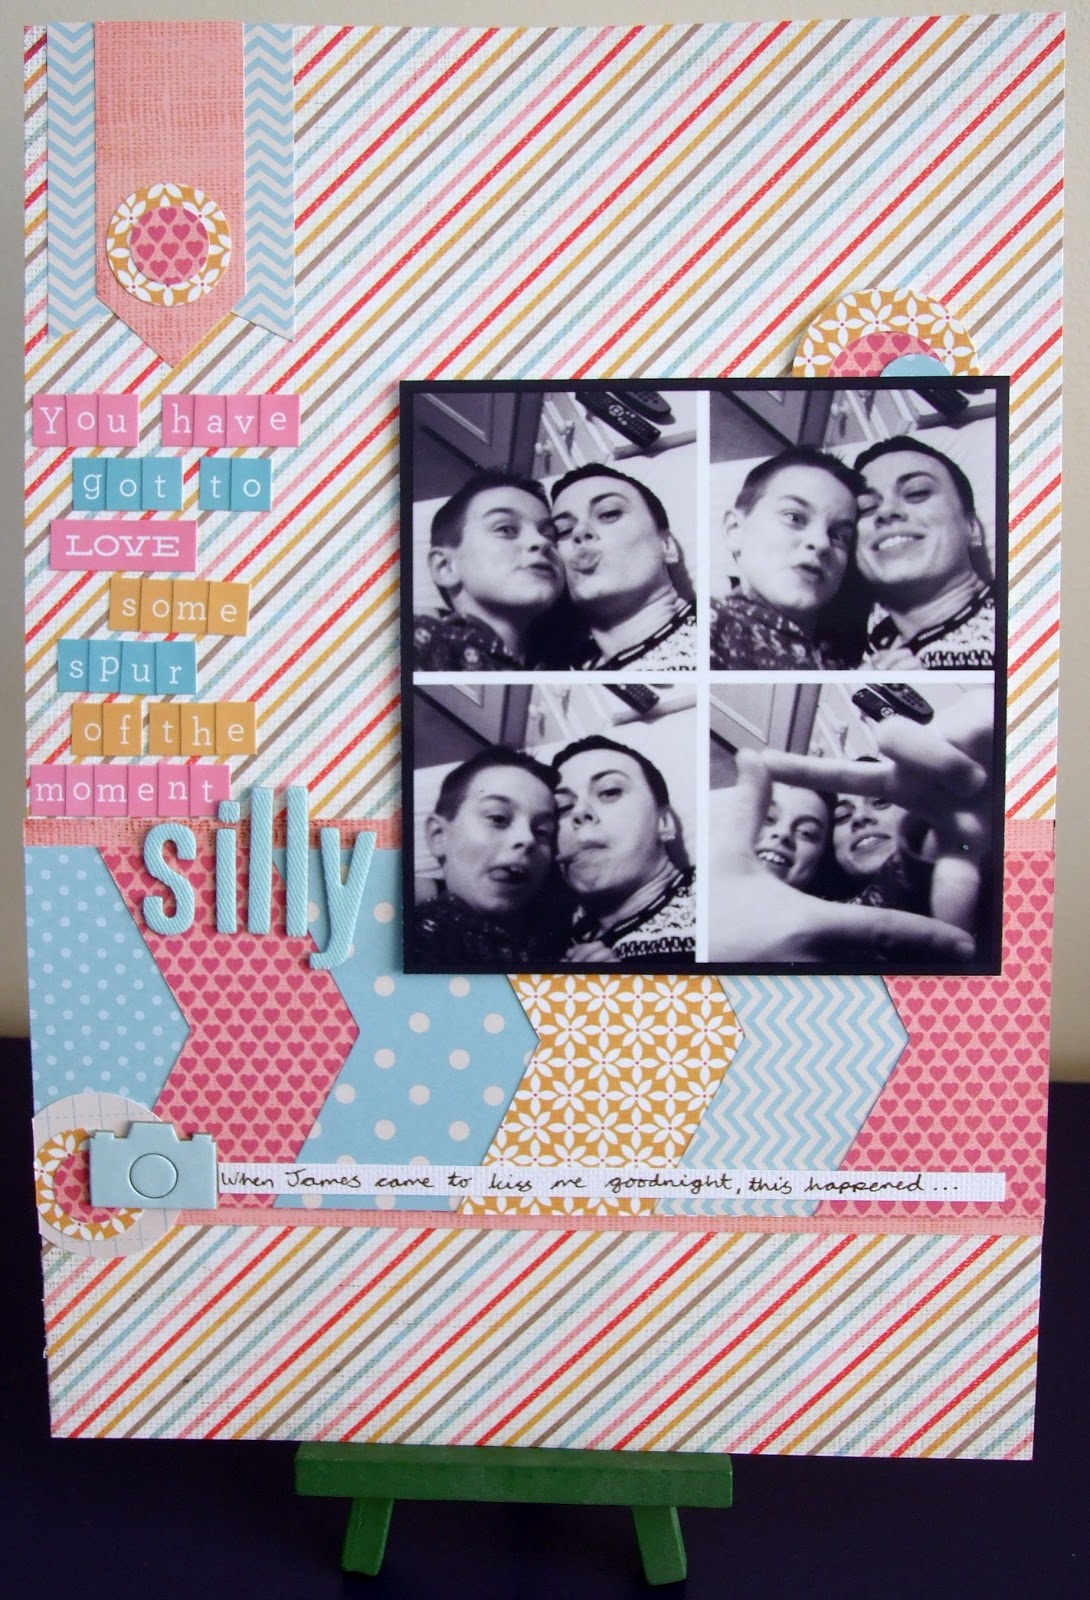
My Minds Eye The Sweetest Thing, Fancy Pants Park Bench & Simple Stories Vintage Bliss. I first chose the yellow and aqua flower print from Fancy Pants, and the aqua with yellow hearts from Dear Lizzy which were similar colours.


Once I've got my papers I pick out some alphabets and embellishments to use with them. I tend to select one set of Thickers for my title card, and a few smaller alpha stickers to use on other cards. I always choose some small word stickers, labels, one colour of twine and 4-5 rolls of washi tape. For this particular spread I have also added in some American Crafts Glitter Tape and American Crafts Zazz glitter glue for added sparkle. Stamps from Elle's Studio and American Crafts, along with my trusty wood veneer box complete the kit.
I do always pick out more than I will actually use, as I like a bit of choice & variation on the cards - you could definitely get away with a smaller kit with just one small alpha and one washi tape for example.


I cut all the pieces first, and lay them out on the table to decided where I want each piece, adding the photos and any ephemera I collected from the week or event. I tend to have a couple of photos that fill the whole slot, and the rest are backed onto papers. Throughout my album for the year I carry certain elements all the way through. This year I am using the top left 4x6 piece for my title (in this case the date) and the bottom two slots on the left to document my pregnancy.


One of the biggest challenges to creating divided pages is keeping it looking like one cohesive page, whilst having many separate elements. Working from a kit definitely helps with this, as does using repeated elements throughout the spread. You can see from the finished pages that I used certain elements a few times, like the luggage tags, the stars and the tapes.
The American Crafts Glitter Tape is a fairly new product and one I will definitely be buying more of! It's lovely & dense in colour, and has a clear peel off backing so on your page it looks exactly as it does on the roll. The glitter doesn't rub off either - I want the glitter on the page and not my hands so that's a definite bonus in my book!
Zazz glitter glues are another new product from American Crafts and come in a huge variety of colours. With a non clog applicator, they stand tip at the bottom so they are always ready to go, and you get loads for your money. Watch out for these appearing in the shop soon!
(Edit: these are now available in the shop - Zazz Glitter Glues)


So that you can get an idea of how some of my other page spreads come together, here are a few older pages from the beginning of the year.


My top tips for working with divided pages:
  • Keep your supplies to a set amount. Work from a kit you put together - include papers, alphas, label stickers, tape, twine and flat-ish embellishments.
  • Use repeated shapes or embellishments throughout the page or spread to keep the separate elements cohesive.
  • Plan! Set out all your pieces first with your photos. Decide roughly where you want everything, and then work on one bit at a time.
  • Keep it simple. Divided protectors are not the place for bulky additions as the smaller slots will warp. 
  • Try using a divided page on the opposing page to a 12x12 layout. Use your favourite photo from an event on a full 12x12 layout on the left, then use a divided protector on the right of the double page spread for some additional photos and journalling.