Hello all, it's Laura here and today I am going to introduce to you a few products available in the shop that work perfectly for "Project Life"
I know that there are a lot of UK scrappy folk who are jumping on the project life bandwagon but if you are new to the game then have a read up over at
Becky Higgins website to find out what Project Life is all about.
For the last two years I have completed a monthly round up of my life in the form of Document 2010 and the Document 2011 but this year I decided to increase my output & complete a weekly spread of our daily lives and weekly activities. And the great news is that there are so many products in at Sarah's Cards that work perfectly for this style of project.
So.... here is what I incoperated into my week 10....
I like to mix my page protectors up throughout my album and I use a mixture of American Crafts, WRMK and Project Life. Sarah's Cards stock a huge variety of spilt page protectors and you can find them all
here.
I use a variety of photos in my pages too, including 6x4 prints from my camera and small square instagram shots from my iphone!
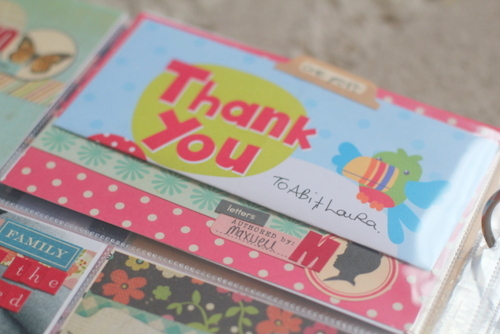
Week 10 was a mixture of regular home life activities and other bits that were more important and worth documenting. From this double page spread here you can see that I documented thank you letters recieved in the post, my baby playiong with her Daddy after work, being asked to be a bridesmaid, having a lunch date out at Giraffe and a day trip to see a friend in London.
My first tip is to seek out small alphabets, theses are perfect for small layouts and mean that you can fit in a tiny title alongside plenty of journalling. In the photo above I used some
Authentique letters alongside some gorgeous
Fancy Pants letters, though there are a HUGE selection of perfect alphabets in stock at the moment! Here are just a few of my favourites...
From top to bottom, left to right... here we have..
1.
Authentique Celebrate Letters - Two sets of tiny letters and a whole glossary of single word stickers that are perfect to embellish your albums.
2. Studio Calico. Found in
aqua and
red and a gorgeous
grey
3. The perfect
alphabeans from Jillibean soup. These have arrived in the shop since I created these pages but they are just perfect for Project Life, a full upper and lower case alphabet in SEVEN stunning colours.
4. An old (ish) favourite from Lily Bee Design in new colourways staright from the halls of CHA. Check out the new colours
here,
here and
here. EIGHT sets on EACH set!
5. In the centre of the grid above is a gorgeous delicate alphabet that co-ordinates with the Dear Lizzy Neapolitan collection, found in
Parakeet and a slightly larger font in
Ballerina
6. My Little Shoebox make a whole range of perfect little letters at a great price. The new CHA colours are
sky,
chiffon,
red lipstick and
kisses.
7. Crate Paper Pretty Party have
this alphabet sheet that showcases two alphas and a matching set of sticker embellishments.
8. A similar sheet of alphas and stickers by Echo Park can be found
here
and lastly 9. The sheet I used in my week was by
Fancy Pants
I also use a lot of stickers in my Project Life pages, these have a couple of benefits... they are flat and when creating small layouts in these spilt page protectors you really want to keep them quite flat (save your 3D embellishments for your 12x12 pages). They are also quick to add, a big bonus if you want to stay up to date with this project and document every week. And finally you can journal right on top of them!
As I said earlier I am completing a double page spread like this EVERY WEEK, most weeks I add an additional insert too. Thats a lot of scrapping and journalling to get done. So I was thrilled when Sarah's Cards got the new Simply Stories lines in. These were MADE for Project Life.... quite lliterally I think! In the photo above you can see a journalling block that has been cut out from this
sheet of paper from the
Fabulous Collection. I added a couple of stickers to create a title and then my journalling below.
Sarah's Cards have three simply stories ranges in stock at the moment and there are a huge selection of papers that have 6x4 journalling cards and 3x4 journalling cards incoperated into the patterned paper designs. Have a look at the three ranges
here.
Below you can see an example of where I had added in a piece of real life into my project life, a thank you note. I have folded it up and added to a 6x4 sheet of patterned paper, if I want to read the note I simply have to pull it out of its page protector to read. Again the sticker sheets from October Afternoon provided the perfect amount of embellishment underneath the letter. I used a sheet from an older range,
Farmhouse but keep your eye on the
"Coming Soon" page of the site for the new October Afternoon collections.
I also added in the dates of the week with one of my favourite new products :
The Roller Stamp for the Dear lizzy line. Sadly this is out of stock by the time I wrote this blog post but keep your eye on the site for re-stocks!
In the photo below you can see another one of my favourite products, a die cut title piece card from My Minds Eye. Again these are a quick and easy way of adding in title and colour into your small pages in double quick time!
And the great news is that there are a ton in stock at Sarah's Cards and they are all at a brilliant price of around 59p each!
These are some of my favourites...
Have a look through the new My Minds Eye collections to seek out your favourites! They can all be found
here.
And my final tip is about pattermed papers... I tend to use papers with small repeated designs on them. These work well when cut down to small pieces, like this
gorgeous butterfly paper from My Minds Eye. In this example above I wanted to add a small border to my paper before I will add in my journalling above.
And last but not least a note about albums. I keep mine in an American Crafts 12x12 patterned D ring album and a huge selection to suit every taste can be seen
here!
Happy Project Life !


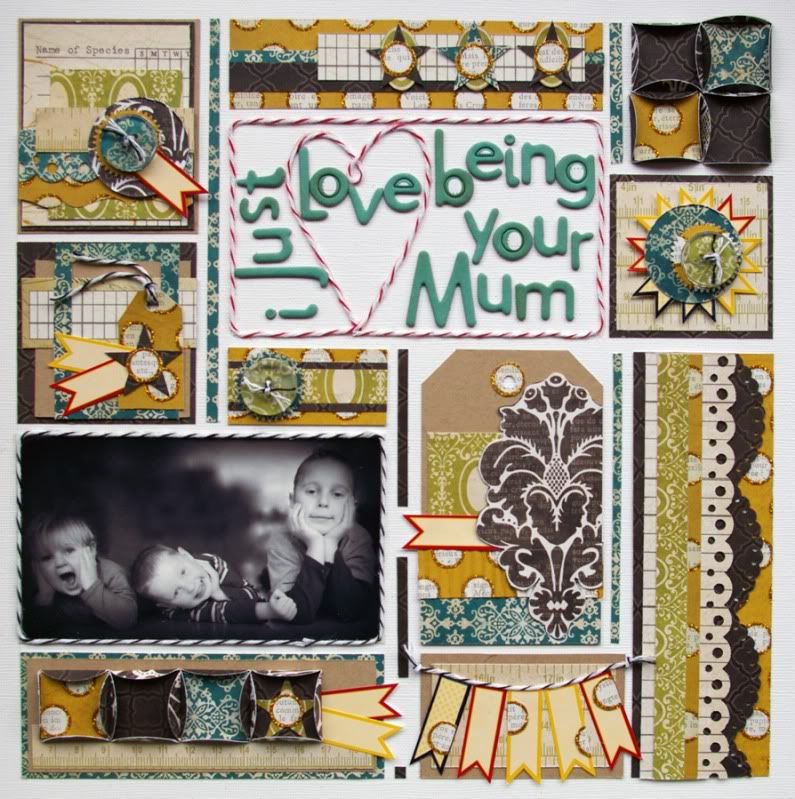

 The photographs are from my son's 3rd birthday but not a single one of them was a "wow" photo. I still felt the need to scrap the event though, so I printed several small pictures off. I then cut pieces from all of the papers to create the grid. Most of the photos fit perfectly onto the grid with just one being mounted onto white then kraft to become the main focal photo. The twine, buttons and a couple of heart stamps were the final touches. A perfect way to use up scraps in my opinion. How do you use up yours?


 So, I have 3 layouts from just 5 pieces of patterned paper, 2 colours of cardstock and some American Craft alphabets. There was also so much left over that I will back tomorrow with a fourth LO made with the same paper range. I'll also post some retreat photos, but to tide you over, here is my favourite!