
Hi all, Jen N here today. I want to share with you a technique I go to when I feel the need to use up some supplies! I made this page to document our feelings about finding out the sex of our baby before he or she arrives - we like a surprise!

The Simple Stories I Heart Summer range was the perfect fun mix of bright colours for a gender neutral page. Even when baby arrives, he or she will definitely be dressed in rainbow brights so I liked that using these colours on a pregnancy page will bring some continuity.
There are certain supplies that I seem to collect but rarely use, and buttons and brads are two of those. I recently had a clear out and sold a lot of my vast collection, but I still have a substantial amount! Here's my button storage jar, and I have another for brads although that's not quite as full.

I wanted to create a big heart embellishment in the centre of the page using up lots of buttons and brads in the process.The first step was to lay out the basic elements of the page - I used the gorgeous diagonal stripe for my background (I gutted the centre because it's so pretty!) and laid a 10x10" square of a plain-ish design on top. I then added my photo, a strip of the teal boardwalk design, a 4x6 card from the cut apart elements sheet and a die cut piece from the SN@P cards pack.
I drew a heart onto some scrap card and cut it out placing it roughly in the centre of my page, overlapping all the other elements. In this case I drew around a small heart shaped bowl I have on my desk for storage, but you could draw around anything, or hand draw, or even print off a shape from the computer and use that as a template. You can see that I decided my initial drawing was a bit small, so I just cut a bit away from the line. One of the rouonded edges didn't go far enouh out, but it doesn't matter - this piece will be covered up anyway!

The next step is to pick out a few buttons to get started with. I poured some of the contents of my jar onto a tray and sifted through to find buttons that were a good colour match for the papers. I pulled out a selection to get started with. I won't use them all, and I may have to go back to find others that are a better size for certain places, but it's a good starting point.

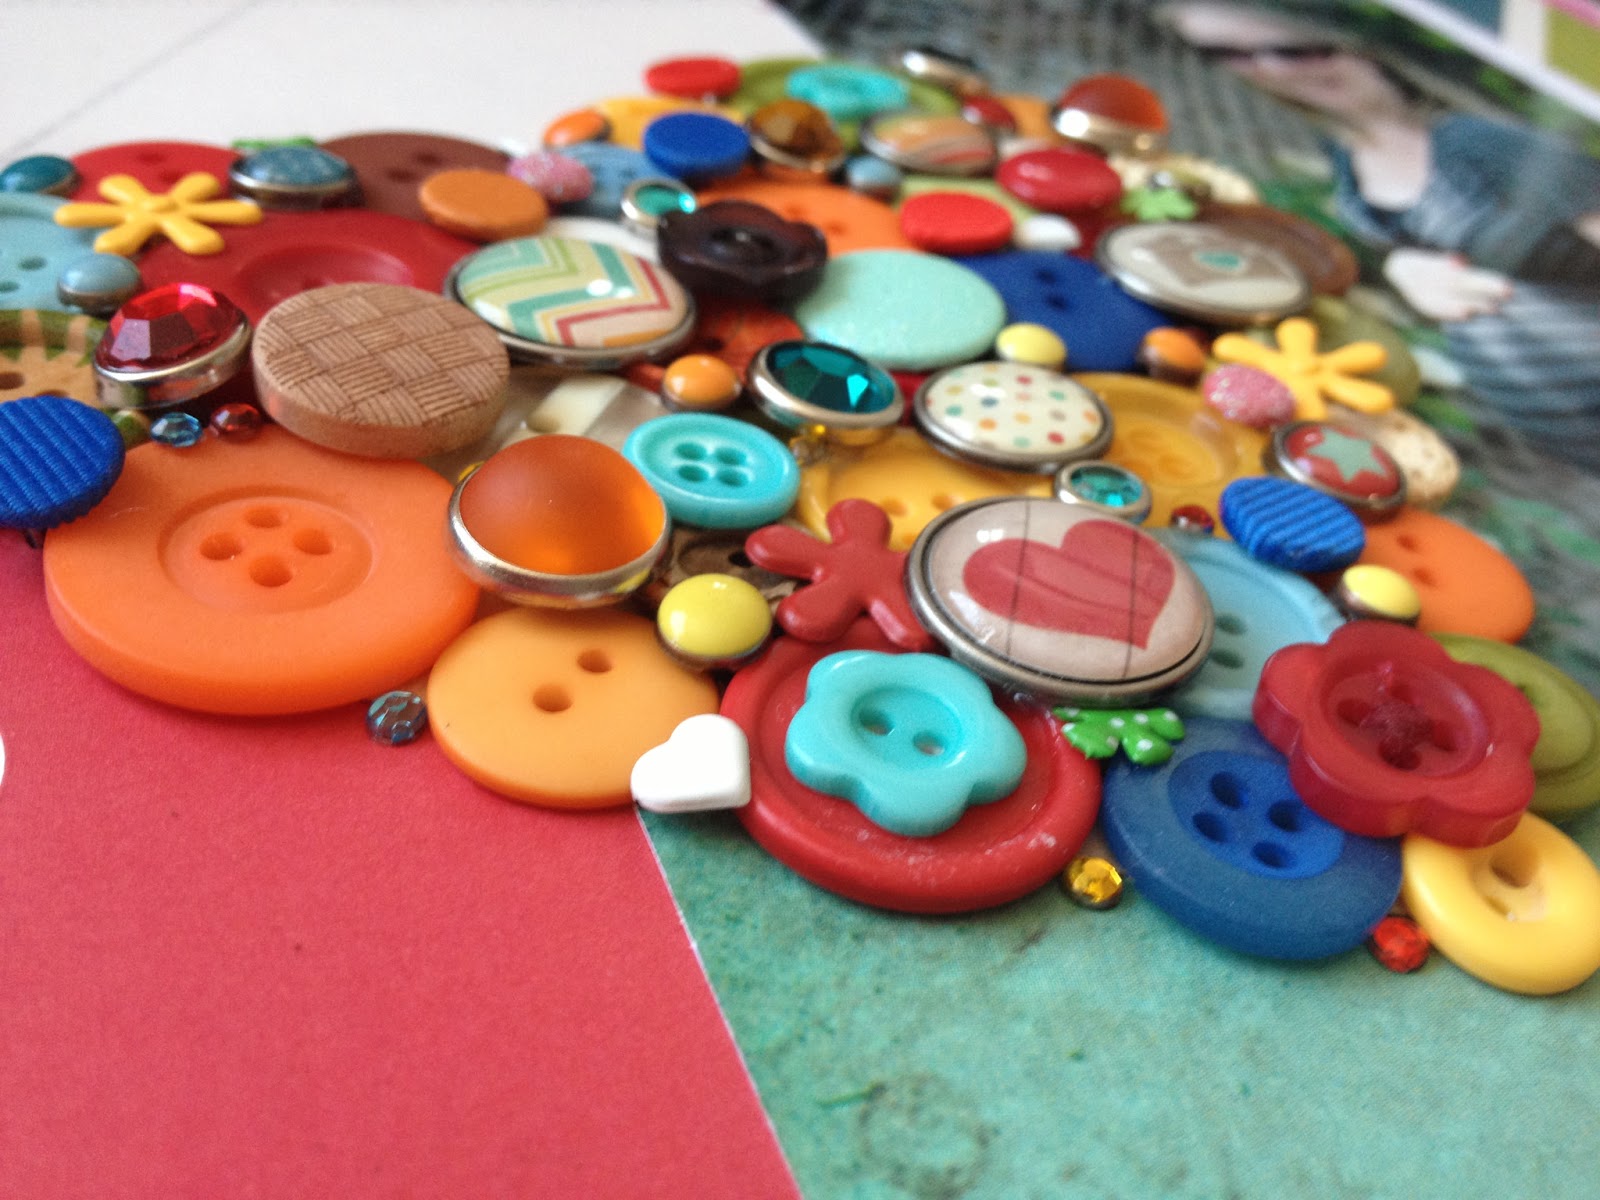
I then start filling in the shape. I lay buttons along the edge of the shape first, mixing up the sizes and colours, and then fill in the middle. You will definitely have a lot of gaps and that's fine. This technique is all about building up gradually. Just try and fill as much of the shape as you can. For this stage I do lay them all out before sticking anything down, as I want to make sure that I fill the shape evenly and don't put too many of the same colour together. Then I stick everything down with wet glue and leave it to dry thoroughly.

This is your base layer complete. Next up are the brads. Again I sifted through the contents of the jar and pulled out a selection onto my desk. I also used several from the Simple Stories brad pack to bring the whole page together - using brads from the coordinating collections means I know I'll have some repeated elements and colours that exactly match my papers. It just gives a nice cohesive look to the page, but certainly isn't essential, and isn't strictly stash busting!
Start filling in the gaps in your shape with brads - use a few bigger ones first to cover some of the larger spaces, and then fill in smaller gaps with smaller brads. It's a very simple process really. There's no need to pre-plan this part, just get your paper piercer and one at a time add the brads.

You'll end up with something like this. If you look closely you can still see a few gaps, a few tiny sneaks of that kraft cardstock shape especially around the edges. That's the trouble with using circular embellishments to cover a straight line! To cover those final bits I add a few tiny gemstones, which give a lovely subtle sparkle too.

It's done! The finished article will be pretty heavy, so I reinforce the layout by attaching the whole page securely onto a piece of plain cardstock for support.
A title, some journalling and a couple of stickers are all that's needed to complete the page.
Why not have a look at the selection of buttons and brads available in the shop, or turn to your own stash and give it a try!


7 comments:
Gorgeous page Jen - not long now :) xx
Beautiful page, Jen. I love the multi-coloured button heart. It's the anticipation of what baby is going to be that adds to the excitement. I just can't understand this need to know that many parents have these days ... the argument my granddaughter gave me was that knowing meant she could plan what colours to paint the nursery, etc, but neutrals like yellow and green are pretty too. You will be so delighted when baby is finally here - not long now :) Elizabeth xx
Beautiful page, Jen. I love the multi-coloured button heart. It's the anticipation of what baby is going to be that adds to the excitement. I just can't understand this need to know that many parents have these days ... the argument my granddaughter gave me was that knowing meant she could plan what colours to paint the nursery, etc, but neutrals like yellow and green are pretty too. You will be so delighted when baby is finally here - not long now :) Elizabeth xx
Love this layout and this ideas with the buttons. I am team surprise too but was due last Wednesday and am fed up waiting! X
Oh this is soooo lovely :)
Love the button heart! That is so awesome!
As fantastic as that looks, I am hyperventilating at the thought of using so many buttons in one go! And I have an enormous collection of buttons that I hardly ever use!
Gorgeous LO
X
Post a Comment