

Saturday, 30 October 2010
Count Me In
Sometimes papers can seem a bit difficult to use on a layout purely because of their bold patterns, Sarah has overcome this by concentrating on the colours instead of the designs in these Sassafras "Count Me In" papers and used blocks to create the background for her photos. Leaving a gap between each patterned block ensured that the page didn't get too busy and that the photo stayed the focal point of her page.

Tuesday, 26 October 2010
Taking Time
 "Taking Time- This photo was taken in June when I travelled to the coast for my friends birthday party (no we're not too old for birthday parties). I thought this photo was really funny, and as I had such a great time I wanted to document it. My friends live along way from where I live, too far for my liking but considering the distance we are very close and ensure that we stay in touch. Good friends make you want to make the long journey to the other end of the country, and these friends are definitely worth it.
I have used Cosmo Cricket Pixie-Licious papers, the layout was quite simple to put together as I combined strips of paper both vertically and horizontally on my cardstock and then added a block of paterned paper underneath my photo. I added my journaling on thin strips of kraft paper."
 Don't forget out current sketch challenge, you have until Monday 8th November to enter all the details can be found here.
 Sunday, 24 October 2010
Shes Two!
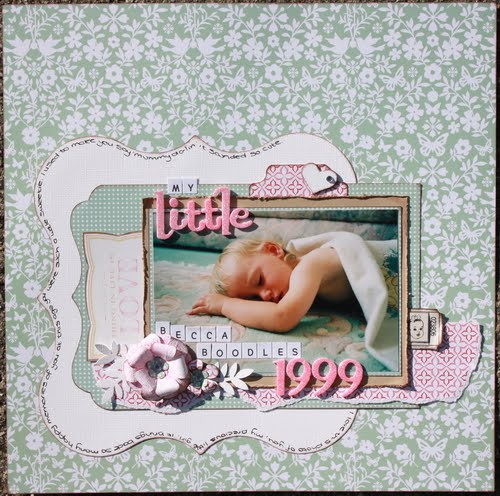
Over the last few days we have been sharing some stunning pages created by Cathy using the gorgeous MME Lost and Found Madison Avenue papers. Here is her final page, another stunning creation.

 "I sanded the edges of my photos and as they were all quite dark I matted them onto pink paper to lift them. I used foam pads to raise the matted photos and all of my embellishments creating a page with lots of depth and dimension. I made a pleated pinwheel before I gathered up a small piece of lace and added a prima flower to the centre."
"I sanded the edges of my photos and as they were all quite dark I matted them onto pink paper to lift them. I used foam pads to raise the matted photos and all of my embellishments creating a page with lots of depth and dimension. I made a pleated pinwheel before I gathered up a small piece of lace and added a prima flower to the centre." Friday, 22 October 2010
Think Pink
As promised here is another page that Cathy has created using MME Lost And Found Maddison papers.

 "For this page I wanted to keep it quite modern (even thought the papers have a vintage feel) so I started with the strips of different papers down the right hand side and then placed my photo at the bottom. I then added the edge of the shaped paper to add a girly touch. I traced around the Jenni Bowlin die cut butterfly and cut it out punching tiny holes around the edge afterwards. I have added a Prima flower to the body of the butterfly to add a bit more prettiness. I punched a strip of dark brown cardstock using the bracket EK Success slim border punch and placed it under the edge of the strips of paper. This helped the shaped paper to stand out more on the page. I underlined my title using a Sew Easy tool and pink embroidery floss."
"For this page I wanted to keep it quite modern (even thought the papers have a vintage feel) so I started with the strips of different papers down the right hand side and then placed my photo at the bottom. I then added the edge of the shaped paper to add a girly touch. I traced around the Jenni Bowlin die cut butterfly and cut it out punching tiny holes around the edge afterwards. I have added a Prima flower to the body of the butterfly to add a bit more prettiness. I punched a strip of dark brown cardstock using the bracket EK Success slim border punch and placed it under the edge of the strips of paper. This helped the shaped paper to stand out more on the page. I underlined my title using a Sew Easy tool and pink embroidery floss."Wednesday, 20 October 2010
So So Sweet
Cathy has been busy creating with some of the gorgeous Lost and Found MME Madison Avenue range and over the next few days we will be sharing her stunning pages with you.
"I traced half of the shaped paper onto the stripped glitter paper & placed it onto the kraft cardstock. The strips across the middle were punched with the EK Success slim border bracket, I layered up 4 pieces for a 'frill' effect. The tags I made myself by tracing a post office mailing label and made the reinforced circles by punching a 1/2 inch circle and punched out the centre using a crop a dile. I used the 'Sew Easy' to run around the top right of the shape and used twine to stitch & to tie bows in the tags. The little birdie on the tag has been stamped using the MME Madison Ave 'Pretty' stamp."


"I traced half of the shaped paper onto the stripped glitter paper & placed it onto the kraft cardstock. The strips across the middle were punched with the EK Success slim border bracket, I layered up 4 pieces for a 'frill' effect. The tags I made myself by tracing a post office mailing label and made the reinforced circles by punching a 1/2 inch circle and punched out the centre using a crop a dile. I used the 'Sew Easy' to run around the top right of the shape and used twine to stitch & to tie bows in the tags. The little birdie on the tag has been stamped using the MME Madison Ave 'Pretty' stamp."


Monday, 18 October 2010
Monday Class
Are you looking for something to do this week? How about having a go at this simple class Rachael has put together for you using Dear Lizzie Enchanted papers.
You will need...
Dear Lizzie Enchanted papers
Fancy Glitter Foam Thickers
White Cardstock
Flower Punches
Dear Lizzie Enchanted Stickers
Small Alphabet Stickers
Jenni Bowlin Ticket
Tab Punch
Water Mister
Mica Mist
 How To....
1. Cut out a small scallop from the white cardstock, ink the edges and stick it onto your background paper.
2. Cut out a rectangle creating a scalloped end on the left hand side, adhere this onto your page.
3. Matt your phrase sticker onto kraft leaving a narrow border all the way round.
4. Cut a strip of paper tearing both ends and along the bottom. Add the matted sticker and torn strip onto your page.
5. Create a double matt for your photo and add to it your page, don't put the glue right to the edges.
6. Add a punched tab to the top of your matted photo and the JB ticket to the right hand side.
7. To create the biggest flower punch 3 large flowers from the white cardstock and spritz them with water, scruch them up and then carefully unfold them.
8. Spray each flower with mica mist and allow them to dry throughly.
9. Once dry roll each petal under and layer the flowers up ensuring that the petals don't directly overlap.
10. Add a smaller punched flower and a gem to the centre.
11. I have also added a smaller flower, some punched leaves and a chipboard heart to the page.
12. Add your title over the photo and journal around the edge of the scalloped shape.

Hope you enjoy doing this class and if you would like to share your layouts then post a link to your page in the comments box.
Friday, 15 October 2010
Sketch Challenge
As promised here is Lianne's sketch for our challenge this month, all the design team who used this sketch loved it so we can't wait to see what you do with it. To take part all you have to do is create a layout or card using this sketch as your inspiration and post a link to your creation in the comments box by the Monday the 8th November. Alternatively you can email your entry over to sarah@sarahscardsltd.com. The winner will be chosen by the design team and will win a £10 e-voucher to spend in the shop and an opportunity to join the design team in creating an example page for the December challenge.
 Last month the sketch challenge was won by Katherine, she has joined us this month and created this stunning page. Here is how she created her layout.
"I used Basic Grey Kioshi and some Prima pastiche papers. I cut out my circle (using a plate) and then cut some strips of paper lace, made with my MS punch; I cut the lace up into sections and then stuck them around the edge of my circle. To give the page a rough distressed look I crinkled the edges of all my pieces of paper. I used some co-ordinations white wash paper to mount the photo and make the lace and sanded these. I then made some water distress flowers out of the Kioshi papers, adding some glitter and prima gem swirls. I tried to keep the colour tones quite pale so the crashing waves in the photo stood out."
 The design team have also been busy have a play with the sketch and have come up with some gorgeous pages.

Lou has rotated the sketch 90 degrees to the left.

Sarah created her page using Cosmo Togetherness papers, the edging to the circle has made using the EK Success open scallop punch.
 Rachael has used the same paper range as Sarah, the circle border has been created using a small circle punch.
 Jen
Jen
.jpg) Rachel
Rachel

We hope you enjoy playing along and we can't wait to see your interpretations of the sketch.
 Last month the sketch challenge was won by Katherine, she has joined us this month and created this stunning page. Here is how she created her layout.
"I used Basic Grey Kioshi and some Prima pastiche papers. I cut out my circle (using a plate) and then cut some strips of paper lace, made with my MS punch; I cut the lace up into sections and then stuck them around the edge of my circle. To give the page a rough distressed look I crinkled the edges of all my pieces of paper. I used some co-ordinations white wash paper to mount the photo and make the lace and sanded these. I then made some water distress flowers out of the Kioshi papers, adding some glitter and prima gem swirls. I tried to keep the colour tones quite pale so the crashing waves in the photo stood out."
 The design team have also been busy have a play with the sketch and have come up with some gorgeous pages.
Lianne has used some October Afternoon Seaside papers, perfect for the theme of her page.

Lou has rotated the sketch 90 degrees to the left.

Sarah created her page using Cosmo Togetherness papers, the edging to the circle has made using the EK Success open scallop punch.
 Rachael has used the same paper range as Sarah, the circle border has been created using a small circle punch.
 Jen
Jen.jpg) Rachel
Rachel
We hope you enjoy playing along and we can't wait to see your interpretations of the sketch.
Wednesday, 13 October 2010
Sketch Challenge Winner
It is time once again to announce the winner of our sketch challenge, the weeks go by so quickly! Our sketch last month was created by Rachel and I hope you all had as much fun using it as we did there were some really great enteries. As always there could only be one winner and that winner is Anna. We loved the combination of colours and the clever way in which she had misted on her page. Congratulations Anna, drop us a line and we will get your e-voucher to you along with details of the next sketch challenge.
 Check back later in the week for this months sketch challenge which has been designed by Lianne, we think you are going to love it!
 Check back later in the week for this months sketch challenge which has been designed by Lianne, we think you are going to love it!
Sunday, 10 October 2010
Misting
Over the past few weeks lots of the design team have been experimenting with the new mica mists and I have to say we all love them!! They are so easy to use and look just great, on this page Vanessa has used them to create a textured background. She has spritzed her background cardstock and used a piece of bazzill, just the edge, as a mask. The overall effect is fantastic and definitley gives the page extra depth.
 Have a look here at the great range of colours and masks that are available. Vanessa has used Fancy Pants Rusted Sun to create this page.
 Have a look here at the great range of colours and masks that are available. Vanessa has used Fancy Pants Rusted Sun to create this page.
Wednesday, 6 October 2010
Dymo Journaling With A Difference.
Nat has created this great layout using Walk In The Park papers by Echo Park and after having problems creating her journaling using a Dymo she has come up with a great alternative.
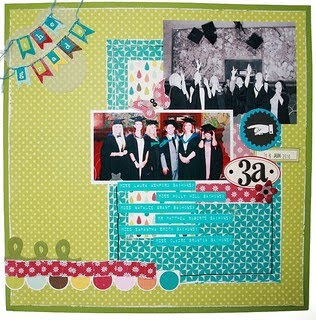 The bright colours of this line by Echo Park were perfect for marking the celebrations on the day my class graduated, particularly as the turquiose papers matched our collars for the ceremony. I wanted to create dymo labelled strips for journalling on patterned paper as I have done so many times before, however on this day my label maker decided it did not want to play ball. To overcome the situation I did the following:
1. Opened a word document and set my document sized to 6x4.
2. I filled the document with a text box, setting the fill option to turquoise (the colour I wanted my strip to appear)
3. Setting the font colour to white, I typed my journalling using a free dymo-effect font that I had previously dowloaded.
4. I printed the finished journalling onto a sheet of photopaper, giving the authentic sheen of traditional label tape.
5. Finally I sliced my journalling into strips using my paper trimmer.

Don't forget you still have a few days left to enter our sketch challenge, all the details can be found here.
Saturday, 2 October 2010
Saturday Class
Vanessa has put together this great class for us today using Fancy Pants Rusted Sun papers.


Stash needed....
• Base cardstock 21.5 x 28 cm (8.5 x 11 inches)
• Two portrait photographs, 8.5 x12.5 cm
• Flowers
• Circle punch (1.5 cm and/or 2.5cm in diameter)
• Two sheets of patterned paper – one of which has elements that can be cut out. (I’ve used papers from the Rusted Sun collection by Fancy Pants).
How To...
1. Firstly, spray at least four of your flowers with the mica mists and put aside to dry. I’ve used Mica Gold on the brown flowers and Rich Coffee on the yellow flowers.
2. Using the same flowers or different ones, place them randomly on the top half of the page to create a mask and then spray the page with the Mica mist. I used both the Rich Coffee and Gold.
3. Once the page is dry, ink the edges with brown chalk ink and also the edges of your photographs. Cut a piece of coordinating patterned paper to approximately 9.5cm x 17cm and stick to the bottom left of the page (landscape) leaving an approximate 3cm border.
4. Place your photographs over the patterned paper, the left photograph slightly higher than the right photo and also to the right side of the page, leaving an approximate 3cm border on the left side. Don’t glue down just yet.
5. Using the second sheet of paper, cut out your elements e.g. flowers, and place under and over the left side of the left photograph. Then, glue the photographs and the flowers down.
6. Take four flowers and layer them to create two flowers, punch two circles from the left over patterned paper for the centres and adhere along the bottom left corner and bottom of the photograph on the left side. Cut out two petals to place underneath one of the flowers.
7. Using the foam thickers, place your title along the top of the photograph on the right side and finally, write your journaling along the top and right edge of the page.
If you have a go at the class and want to share your layout just pop a link to it in the comments box, we would love to see what you have created.
Subscribe to:
Posts (Atom)


