Wednesday, 6 July 2011

Who loves Jenni Bowlin?

I do!

Hi all Rachel here, this month i have been working with some gorgeous products from Jenni Bowlin.

I have a very busy style of scrapping and believe more is more (for me), I just adore Jenni Bowlin embellishments.

I hear lots of people say that a page isn't finished because they don't have enough 'stuff' on it, so here I am showing you how i used some fab 'stuff'.


This is my bundle of the embellishments I have used

Bingo Cards (a personal favourite) 
Stickers (cheap and effective)
Tickets (love love love)
Memo Book (fab for journalling)

So there you go, there are loads of other things you can use, you can find all of it here 

On the first page I wanted to show how you can make a page without using a lot of patterned paper.

I used a tiny bit of MME but simply layered up the embellishments, when I thought it was done I added a few more for good measure.


A quite new product that i love are these Flag Banner Stickers


I've used them on a good amount of my pages lately, especially for dates etc, I have added a couple of cute butterflies here, another easy inexpensive way to add interest to your page. 


I have so many of these tickets, i love them but i am so tight with them, I have never used this many on a page before, its always one just sat at the corner of a photo, but i thought if I was going to show you how to use them i may as well go all out. I love the strips of them, and especially as its man loves woman given the theme of my page.

This page I thought i would show how i used a little of the embellishments and more patterns paper. I used MME again Good day sunshine - girl I love this collection, maybe because it has the cutest cloud paper in ever.


I pulled 2 6x4 photos out of my giant pile of photos and started positioning things, all quite random with no real idea where it was going, (this is how i tend to scrap)


I stuck the papers down and layered the photo on top.

I had a quick check of my Iphoto to check what month this actually was (shocking i know)


I counted it as May! 

I added a few more embellishments


Good old tickets, and my trusty Memo Pad, i love these note books, they appear on most of my pages, they are great to journal of just get some key facts.


The colour on the actual pages (they have about 3 of each type of page) is very subtle, I have the Red and Yellow, you also get some cute stickers in the back. I think these are officially my favourite.


and there you have it


cutest calendar bingo cards, I have been using these for my Document 2011 (this is my May page btw)
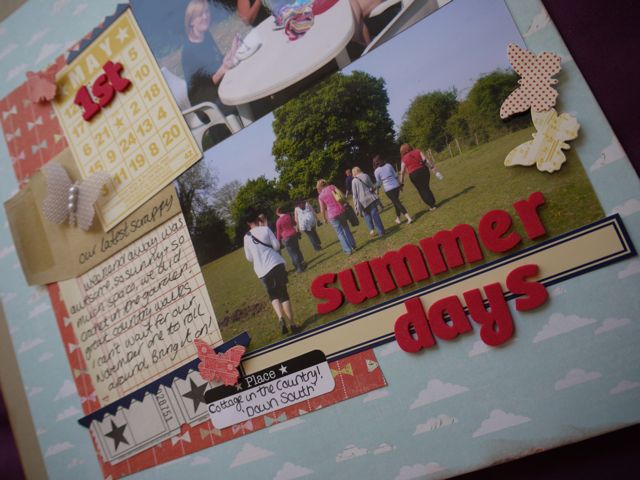

some cute Delight Thickers and a good helping of butterflies and its done..

I hope that has given you some inspiration to go and try some of the Jenni Bowlin embellishments, I will be back soon with my final page.

Thanks

Rachel x

Monday, 4 July 2011

Ways with Sassafras

Sadly, this is Rachael's last project and class for us as she moves on to papstures new. We will miss you, Rachael and thank you for everything you have done over your past couple of years time with us
Without further ado, here is the class Rachael prepared for us before leaving:

Products used:
Sassafras Sweetly Smitten and Starters
Zva Creative pearl swirl

1. Using a sheet of starters paper for your background add a small square
of patterned paper that has been stitched around the top half. Don't
adhere the square right to the edges so you can tuck other elements
underneath. Add one of the great strips that come on the bottom of all
of the Sassafras papers.
 2. Cut out some flowers from the Vintage Lovely paper and add a couple to
the bottom right hand corner of your square. To get extra depth onto
my pages I use a lot of pin flair glue gel which is a silicone free
gel that can be used to raise elements off the page. On these flowers
I have used the usual adhesive along the straight edge that is going
to be covered by more paper and added some gel to the area that will
be on show so it is slightly raised from the page. Add a length of the
die cut strip across the bottom of the square and your photo.


3. Cut out a selection of flower and leaves from the Vintage Lovely and
Floral Fields patterned paper and arrange them at the left hand side
of your page. Add them in the same way as you did the other, using
your usual adhesive on the bottom and pin flair on the top.


4. When ever I use stickers on a page I always matt them onto scraps of
paper first and then cut them out, I can safely move them around my
page without worrying that I won't be able to unstick them. Add your
cloud and journaling block to the top of your square.


5. Add a pearl swirl across the bottom of your square.


6. Build up the right hand corner using cut out flowers and stickers.
Ensure that the end of the pearl swirl is covered.


7. Add some flowers to the top of the square along with your title. I
have added extra detail by using green stickles on the centre of each
of the flowers


Rachael created a second page using Sassafras papers:


All of the Sassafras patterned papers have a gorgeous die cut strip at
the bottom of each sheet, we all spend a lot of money on border
punches but Sassafras have created a product where we don't need to
use them! I wanted to create a page where the border strips formed a
major part of the design.

I created this page in very simalar way to the first in that I cut out
elements from the patterned paper that I liked and thought I could use
and then built the page around that.


And the winner is.....

Huge thanks to everyone who took the time to enter our American Crafts Margarita giveaway. We have used the powers of good old random.org to choose a winner
.
.
.
.
.
.
Number 11:
Eileen said...
Very funky - and if I won it I'd have to put lots of research into finding the perfect cocktail(s) to photograph and scrap :P

30 June 2011 23:40
Congratulations Eileen! E-mail lianne@sarahscardsltd.com with your address and we'll get this gorgeous box of summer goodies posted out to you.
We hope you're enjoying all the projects that the DT have been taking the time to create and post for you, if there's anything you would like to see more of on the blog please let us know!
Lianne x

Saturday, 2 July 2011

Patchwork and poetry.

It's the weekend... and it's meant to be a sunny one. Hope you've all got something wonderful planned... if you're planning any scrapping time this weekend, here are a couple of LOs I hope will inspire you.

The first one is a great way to use up bits and pieces of patterned paper... let's face it, we all have lots of paper scraps! After looking at the gorgeous quilts on Sarah's blog, I have ordered a book on quilting from the book people that go to playgroup, but I got to thinking about creating a patchwork LO. After Googling some patchwork designs (how did we ever live without Google?) I really liked some of the complicated circular designs, and after thinking about how I could replicate the designs without too much blood, sweat and tears, I had a brainwave! I raided the kids colouring books cupboard and found some brilliant doodle books with fab designs. After choosing my favourite, I enlarged it to the size I wanted for my LO, and traced it onto my backing paper. I then cut out all the sections with a craft knife... a bit boring, but worth it in the end. I then simply filled each space with a piece of patterned paper or fabric, sticking into place with sellotape.
I really love how it turned out, and will definitely use this technique again.
Now I had a fab patchwork background, but no photo to go with it.... so back to Google to search patchwork quotes. And I found this cute little poem about family being like a patchwork quilt.
I had recently taken a photo of my mum with the boys, and after tinkering with it in photoshop to give it avintage look, it was perfect to use. I wanted the patchwork background to be the main focus of the LO so I kept the rest really simple by matting the photo and adding it to the LO with baker's twine wrapped around the corners to look like they were holding the photo in place, and printing the poem onto a luggage tag.  

The second LO I have to share with you, is a quick and easy peasy one to put together. I used strips of tickets to create a photo mat rather than using them individually like I usually do.

I loved the paper with the fashion models on but it was a bit much to use in large pieces, so I punched details out with a circle punch. Like I said, a really quick and easy LO to put together, so not much more to say about it....

That's all from me folks... watch this space for more projects from the rest of the team throughout the month. And don't forget to look out for the new monthly challenge that will be coming soon.
Have a fab weekend
xxx

Friday, 1 July 2011

Sarah's Cards Ltd DT CALL

We are looking for two dynamic UK based scrappers to join our team of lovely ladies as part of the Sarah's Cards Ltd Design Team.

The scrappers we are looking for should be enthusiastic, have their own active personal blog, be willing to create projects, layouts and classes with a wide variety of papers styles.

DT members are expected to post minimum once a month on the Sarah's Cards Ltd Blog, design with our monthly kits, be willing to teach or assist at Sarah's Cards Ltd retreats and be confident in creating and teaching classes with step-by-step instructions.

If you think you fit the bill and would like to join our team, please apply! We are asking for the following from applicants:

  • We need you to send us good quality photographs of 4 layouts (max. 800 x 800 pixels) which you think illustrate your style and show a variety of techniques
  • Provide a description of techniques used on all four of your layouts
  • Provide step by step instructions for one of the layouts, with additional photographs if necessary (as if you were creating a written class instruction)
  • Please also provide links to any online blogs or galleries
  • Tell us about any previous experience teaching scrapbooking or crafting classes
  • Let us know of any previous or current design team positions
  • Tell us a bit about yourself and why you think you would be a good addition to the Sarah's Cards Ltd design team

Sarah's Cards Ltd Design Team members are expected to design exclusively for Sarah's Cards Ltd (challenge blogs and published work excluded). You will be given the opportunity to choose product to create blog posts each month and a generous discount on all personal stash purchases. You will be designing with our monthly kits - your layouts and write ups will feature in our printed kit brochure.

Feel free to e-mail us with any queries!

Your submissions should be sent by midday 1st August 2011 to lianne@sarahscardsltd.com

We are sad to see Cathy Windsor and Rachael Elliott leave our design team this month, but would like to thank them for all their contributions and wish them all the best with their future ventures.

Let sleeping dogs lie...

Don't you just hate thinking of blog post titles?!?!? I know this one might sound a bit strange, but when you look at my LO I have to share, you'll see where I'm coming from!

So a whole month has zipped by and here we are on the 1st of a brand new month. July is the BESTEST month, and the BESTEST people are born in July ;-)

So, did you enjoy all that June on the Sarah's Cards blog brought to you? We're loving the new system, and we hope you are too. July will be chock-a-block full of beautifulness too, so make sure you come back each day... or at least every few days to see what's ocurrin!

I just loved this photo of my dog taking an afternoon nap on my new jammy dodger cushion (that's what the kids call it). I decided to create a circular LO, and used pink to match the cushion, white dotted Swiss, and a Hambly overlay cut to shape. I picked out a range of patterned papers that matched the turquoise colours of my other cushions. After punching some circles and cutting an oval, I stuck the shapes under the overlay, using the printed design as a guide. Once the photo was stuck in place, I added a couple of border punched strips below, and hand cut some of the lovely peacock feathers from this paper. I decided to delve into my stash from ye olde days of card making!!! I'm sure I'm not the only person who used to be a card maker, and who bought everything they could lay their little hands on, tried everything, often only once, and as a result has a stash of unused supplies!!! Well, I found a quilling tool, and a heap of quilling papers, and thought why not! I kept it really simple and added a few strips of paper stuck on their edges, and a some tightly coiled circles as flowers. Simple but effective, and cute to boot!
Keeping the floral theme going... hey, I have boys... if I get the chance to use flowers in abundance on a LO I take it and run with it! I saw these cute fabric flowers on Pinterest ages ago, and when I saw this fabric swatch book, I just knew I had to have a go at them. And because I'm kind, I took a few step by step photos, so you too can have a go.

Use a template to draw 5 circles on your fabric. I used a 1.5 inch circle for my flowers.

 Cut the circles out. Fold each one in half, and then into quarters.
 With a long length of good quality thread, stitch along the curved edge of each folded circle.
 Once all 5 circles are stitched, pull the two ends of the thread and tie securely. This is why you need good quality thread... I used cheapo stuff the first time and it just snaps at this stage, which is hugely annoying!
 I added buttons to the centres of my flowers, but a smaller circle of contrasting fabric, or a Prima flower centre would work too.
Ta Da!!!! How easy is that?
I can see fabric flowers appearing on LOs throughout galleries and blogs very soon.... and we'd love to see how you use them. Leave us a link to your work in the comments box so we can pop by and have a looksie.

I'll be back tomorrow with another couple of LOs to share.

Bye for now
xxx

Thursday, 30 June 2011

GIVEAWAY - Fancy a Margarita?

We love a cocktail or two here at Sarah's Cards, and the new Margarita range from American Crafts is hot hot hot, perfect for scrapping those summer holiday photos or creating bright and funky cards. We would love to share our Margarita with one lucky blog reader.

Here's what you could win:
Here's how to be in with a chance to win: Leave a comment on this post by midnight on Sunday 3rd July and using the power of random.org, we'll select a winner and post the winning comment on Monday. Please check back to see if you're the winner and for details of how to claim your prize.
Good luck!

