Friday, 29 March 2013

Dear Lizzy Lucky Charm Die Cut Cards

Hello. It is Ifa with you today. Are you all ready for Easter.  How many eggs have you got stashed ? I hope I don't eat too many! I am also hoping for a lot of sleep and just chilling, over the school holidays.

Some of you might have seen this product in The Store. I did. And I didn't give it a second glance until I picked it up at the real-life store at The Retreat.


The back of the packet shows more promise.  You get 10 cards in an assortment of colours and die cut with patterns and words. I haven't got a die cut machine so this pack is the perfect item to fill that gap. You might have seen a few layouts with "I love you to the stars and back".  Well, one of the card says exactly this. I was very excited.


I imagined most people would just use the cards as is on their layouts. I am going to show you a few additional ideas to put these cards to good use.

The first thing I thought of doing is using the cards as stencil. I traced around Hello Sunshine for this layout.


The Hello part went on the background card stock in black ink before being coloured in with some mist. The Sunshine went onto a black and white photo and cut out using scalpel. I added a strip of glitter tape underneath the word Sunshine.  I love the glitter tape, the glitter is well and truly stuck to the tape and does not rub or drop out.

I also saved all the letters that popped out of the die cut card. One card features hearts so I popped them out and gave a selection glitters. I added a generous dollop of diamond glaze to the top, making sure the glue covers right to the edge before shaking a generous helping of Wow! Glitter. Some I embossed with Zing! Embossing Powder. I also added additional glittered hearts punched out of the glitter tape.

This is the complete layout...I am lamenting the lack of good weather!


In the next layout, I have used a die cut card on my layout but I embossed it with woodgrain embossing folder on my Big Shot.


The full layout shows my boys on the Segway in Paris. My younger son got on the Segway and whizzed about as though he has many years experience riding the Segway.  I have to confess, it wasn't as easy as he made it looked.


The circles are made using these little Pigment Ink pad over the Studio Calico Circle Mask. The inkpads, due to their small size allowed me to apply ink to one circle at a time. I think it went well with the handrawn patterned on the Studio Calico Here & There paper.

So will you be buying anything I've highlighted here ?  There is a 15% discount with code EASTER15  this weekend only. Sounds tempting, doesn't it ?

That's it from me this month. I have a few more ideas brewing using these die cut cards. I will share once they make it out of my head to a layout or two.  In the mean time, have a good holiday and see you next month.

Blogged by Ifa


Tuesday, 26 March 2013

24/7

Hi all, Tracy G here.  Looking out of my window today and seeing the sun shinning , I could have easily been fooled into believing that spring had finally arrived, although on going outside and feeling  the easterly winds on my face, I was immediately corrected in my thinking, as it’s absolutely freezing. So instead of getting out into the garden to do some much needed tidying up ,  I've  had a day playing my craft-room, which is much more fun anyway.
This month I have chosen to play with one of the new Simple Stories collections, 24/7. I went for the collection kit, which is great value for money and comes with 12 papers (6 x patterned papers and 6 x cut-apart elements) Two 12x12 sticker sheets Six 4x6 transparencies.  

My first layout features a photo of my ‘old man’, taken as we were walking through the streets of Amsterdam, after I spotted a shop called ‘The Old Man’, and I made him cross the road and stand outside it so I could take a photo of him, he wasn’t embarrassed, much.


I started by applying ink to my background paper through a Crafter’s Workshop - Tile Texture - 6x6 mask.
 I used one of the transparencies in the pack over the photo , which I had matted onto a piece of patterned paper the same size as the transparency.  There are some fab readymade elements on the sticker sheet, such as the banners I used here.

My second layout features our Son, showing off one of his novelty gifts at Christmas time, which we brought him because of his love of Lindor Truffles.  Again I used one of the transparencies in the pack, but this time I put under the photo.  I wanted the giant Lindor to be the main focus on the photo, so used the Focus B&W feature in Picasa 3 to highlight it.

Whilst I still had the collection out on my desk, I decided to make this quick card before I cleared away.
I can't believe my baby will be 17 next week, (I will also be another year older the day after, eek) how did that happen?, and when did I become old enough to have a 17 year old Son?

By Tracy x

Sunday, 24 March 2013

Productivity!

Hi folks, Jen G here. There's nothing like a weekend away with like-minded crafters to boost the productivity! In between the classes; the bingo; the quiz; the raffle; the food; the shopping; the gossip; the food; the shopping; the gossip and the shopping... we actually got some layouts completed too (well some of us did - I shall mention no names DT girls!)
I seriously over packed as usual. I had a box full of papers with me that I didn't even touch. I had planned to start with my latest Studio Calico purchase and move on from there, but my latest purchase lent itself to 5 pages. When ordering I couldn't decide between "Here & There" or "Snippets" so both fell into my basket. I mixed and matched the papers and chipboard arrows / cameras to create these pages.
This first page also has a journal card from the "Here & There" range and Letters / Typeset stickers by Simple Stories.
On my second page I needed a pop of orange which I found in the Pebbles Basic range. These papers are SO versatile. The colours lend themselves to so many other ranges. I used the Apricot Dot paper to matt the whole photo area and to cover the DIY Thickers.
On my second and third pages I dipped into my Washi tape collection to add some extra detail. The shop has a huge collection of them here.
On this page I used the "Snap" Typeset letter stickers again. I use these so much that I am already on my second packet. Did you know that if a product is out of stock on the new website, you can now sign up to receive an email notification when it is back in stock. How handy is that?
This last page has a banner on it from a Pebbles "Basic" Banner & Twine Kit. I spotted these at the last minute at the retreat and scooped them up ready for a future blog post, so watch this space.

We would all love to see how productive any delegates were at the retreat last weekend, so don't forget to leave us a link to your work. And those of you who couldn't make it - what have you been creating recently? Leave us links to your blogs or online galleries in the comments below.

Friday, 22 March 2013

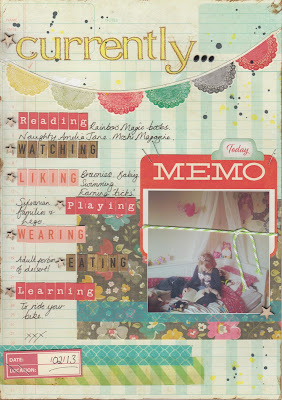
Currently...


One of my favourite types of layouts is where I document what my children are doing right now.  It's great to be able to look back and see the little details of their development.  I have a notebook that I jot down things they've said, their achievements and what they've have been enjoying doing.  

Each layout uses papers and embellishments from the new Crate Paper DIY collection, from which I picked out the ledger patterns to use as backgrounds so that there was cohesion between all of the pages for each of my children.

About a year ago, I pinned this page from a journal with a list of journaling prompts, knowing that I'd like to use it for a layout: this was used as the basis for my first page about Evie, using the headings as journaling prompts.


For this page about George, I used some small wood veneer pinked circles as bullet points and wrote straight onto the lines on the ledger paper.  The journaling came straight from the jottings in my notebook.


On this final page I decided to write a paragraph of description about Oliver right now, again writing directly onto the layout using the lines on the patterned paper.  Again my journaling was pretty much copied from the observations that I'd noted down.


There's a lot of handwritten journaling on these pages which helps to speed up the process and make it more personal too.  There's more information about using your handwriting on this post here.


by Helen


My Supplies:
Crate Paper DIY Collection Pack
My Mind's Eye - Collectable - Notable 'Memo' Title 
My Mind's Eye - Collectable - Unforgettable 6x6 Paper Pad  
Pebbles - Love You More - Kensie Thickers - Robin's Egg
Jenni Bowlin Acrylic Stamps - Outline Alphabet 


Thursday, 21 March 2013

Knee Highs and Bow Ties

What an amazing time we all had at the retreat last weekend.

While I was busy teaching and enjoying myself I managed to actually play with some of the new Basic Grey - Knee Highs and Bow Ties collection.

My first page incorporates the bows that I taught in my class at the retreat, I thought it would be nice to give those that couldn't attend the opportunity to have a play with my tutorial.


I love the background effect I made for this page. I used a mixture of Hueys Mists, Acrylic paint and Chalk Ink pads. The mask that I used is a |Crafters Template that is available in the shop but not listed on the site at the moment as I purchased it at the retreat. The Pegs are are by Deja View and also a new addition to the shop that should be uploaded soon.
I have also added Rub ons and Buttons from American Crafts - Amy Tan collection.

If you would like a copy of the bow tutorial I have a PDF file that i cant seem to attach to this post so please email me claire.wheatley@ntlworld.com and i will forward you a copy.

My second page is using the same Basic Grey - Knee Highs and Bowties collection. 
For this page I used the sketch that provided as a challenge at the retreat. I chose the vibrant papers to make this page.


I'm sorry my photos are a little poor due to poor light when I took them.


Love Claire xx


Monday, 18 March 2013

A Wonderful Weekend!

The past weekend saw the fifth, and final (for now) Sarah's Card's Retreat. It was a fabulous weekend as usual, full of fun, laughter and scrapbooking.

We had six fabulous classes:
Bright and funky Family by Tracy Gough


Mon Bebe incorporating some clever origami bows by Claire Wheatley


A Project Life style divided page by Jen Naulls


Louise Stevenson got everyone doodling with her This Clan Rocks class


The delicate Together by Ifa Zainon used some pretty stamp embossing techniques and badge making


And Helen Eddie got everyone sewing with her bright patterned design


All delegates rose to the challenges and worked on their layouts diligently...some (who will remain nameless) actually following the instructions for the first time ;)


The crop room was the place to scrap at our leisure:

When not cropping, we all busied ourselves with our second love.....shopping!


All this hard work required a god source of energy, which could be found at the sweet table


No retreat would be complete without our evening entertainment in the forms of our resident Bingo Caller, Tracy Bingo,

and Quiz Mistress Helen "Keep The Noise Down at the Back" Eddie.
As it was team member Jen G, and delegates Natalie Jane and Candace's birthdays, it was only right that we celebrated with a giant cake!
The delegates made a beautiful presentation to Sarah & Lianne of flowers and a very special layout signed by everyone present, which the DT would like to thank Carla and Claire for organising:

We hope that everyone had a fantastic time, and went home with aching sides and happy memories as well as layouts to be proud of! 

Sarah, Lianne and all of us on the DT would like to thank all our attendees, past and present, for your company over the past five retreats - we really will (for now!) miss the banter, jokes and your company that we've come to know and love, and which makes the Sarah's Cards Retreat special to us all.

Love,
The Sarah's Cards 2013 Design Team
xxxxxx 

Tuesday, 12 March 2013

{Basics}

It's Jen N here again with a closer look at one of the new ranges into the shop - the Basics range by Pebbles Inc. This is a hugely versatile and usable line consisting of papers in a rainbow of colours, and available in popular designs such as polka dots, chevrons and grids. In addition to the papers there are also stickers, die cuts, thickers alphabets, journalling cards, chipboard pieces and wooden pegs. My favourite product that they've added to this collection is the washi tape - it comes in sets of two coordinating rolls, in polka dot and chevron designs and is about half the width of your usual washi tape. It's great!
Click the image below to go straight to the products in the shop.

 I've created three pages using a selection of goodies from the range. The first uses strips of paper to make a patterned background. The bright colours complimented this slightly obscure photo of me holding a miniature pineapple! These featured in the table flowers at my sister's wedding last year, and were a firm favourite with all the guests. I managed to snag one to keep! On the top and bottom paper strips I added a row of tone on tone punched hearts on foam pads, to give a little dimension and interest.


For this next page I chose a more select set of colours from the palette,  to compliment the photos of my little boy enjoying our garden after it was landscaped. We had it converted from gravel and waist height raised beds to a lawn, and he just loves it! I punched lots of various sized circles from the papers and arranged them under my photo strip, raising the bottom edges up on foam squares to give some depth.


My last page for today was inspired by the page I created and taught at last year's scrapbooking retreat. It features s sunburst effect, and one of my favourite photos from my sister's wedding. Benjamin was pageboy and looked so adorable in his little suit! He carried a little plaque down the aisle which said "here comes the bride", and was completely unfazed by 70 odd people watching him.


Speaking of the retreat, the annual Sarah's Cards scrapbooking retreat is taking place this weekend. If you are joining us for the fun then I'll see you there! If not, just a quick reminder that shop orders placed after 10pm on 12th March will be processed once Sarah and Lianne are back in the office, from Monday 18th March onwards.