I hope you are enjoying the new look blog, I think you will agree Lou's class was amazing and she has definitely inspired me to try and be a bit more adventurous with paints and inks!
I don't know about you but I have got boxes full of embellishments in my craft room all of which I absolutely had to have at the time but my favourite way to scrap is to just use the patterned paper with very few if any embellishments. There are so many great paper designs out there, one of my favourite has to be Websters Pages but I know a lot of people say they aren't sure how to use them because of the pictorial designs. So I have put together a simple class using some gorgeous Hollywood Vogue papers.
Stash Needed
6x4 photo
Bazzill White
Websters Pages, Hollywood Vogue
Length of lace
Black ribbon
Acetate
MME Stella & Rose stamps
Black Stazon Ink
Stickles
Pin Flair Gel or something similar
Liquid Pearls
Sewing machine or black embroidery thread
How To
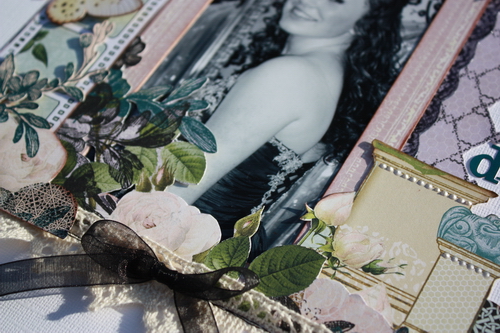
Machine stitch a length of lace across the bottom of your page and an L shape on the right hand side of the layout. If you don't have a sewing machine hand stitching will work just as well.
Cut the film strip out of the patterned papers cutting around the roses at the side and bottom, stick this onto our page but only add glue to the centre so you can push other elements underneath.
Matt the large frame from the sticker sheet onto some scrap paper, cut it out and frame your photo, add it to your page tucking the bottom into the lace and overlapping the roses onto the frame.
Cut out the floral corner from the "Shine A Light" paper and add it to the bottom of your photo, pushing the end under the photo strip and the bottom into the lace.
Cut out another floral corner from the "Double Feature" paper and add over the top.
On the "Foo On Film" paper there is a decorative corner, cut that out and add it to the top left hand corner of your page, use pin flair gel to raise it up slightly. You also need to cut out the little pillars from the same sheet of paper and add this to your page but only add adhesive along the bottom edge.
Stamp a lace pattern onto two strips of patterned paper, I have used a small Prima stamp but if you don't have anything like this you could easily draw this sort of pattern free hand. Cut along two of the edges to create a decorative edge and add the two strip to the edges of the framed photo. Don't worry about the overlap at the top as this will be covered.
Create another lace border using the
MME Stella & Rose Remember stamps to go around the framed photo. Measure the length that you need the border to be and stamp the image onto acetate using Stazon Ink. Cut the image out when it is thoroughly dry and add it around the photo.
To cover up the corner cut out the Chandelier from the "Double Feature" paper, to add a bit more interest I have gone over the black elements with stickles. This will need a long time to dry so don't be tempted to use it too soon, I speak from experience!!
Once it is dry stick it to your page adding some pin flair gel to the bottom edge to raise it up.
I have cut out a butterfly from another Websters paper range and added that to the page but a stamped butterfly would work just as well. Alternatively you could use the butterfly from the sheet of stickers that comes in the collection pack, by matting it onto a scrap of cardstock you will be able to bend the wings up.
Add a ribbon bow to the bottom of the page and some liquid pearls to the top of the pillar and then all you have to do is add your title and journaling if you want to. I am awful for adding journaling onto the actual page no matter how hard I try I just hate my writing on my layouts. To get over this I have started journaling on the back, I know it isn't visible when you flick through your album but at least the story has been documented for the future.
Another paper range that has got some amazing designs to cut out is Pink Pailsee, I have created two layouts using their
Daily Junque range. The only extras that I have used on these pages is some bakers twine, tissue paper, some alpha stickers, MME stamps and some liquid pearls.
I have been really inspired by Lou's use of stamps and paints so thought I would take the plunge and stamp directly onto the layout, something I always avoid! I am actually really pleased with how it looks and it was definitely worth a go, next time I am going to try and be a bit more adventurous and maybe crack the paints out!!
I have fallen in love with the bakers twine, it adds great depth to a layout and is so easy to use. I decided roughly how I wanted the twine to lay and then added it a bit at a time just gluing it where the twine overlapped on the twists using a hot glue gun.
This page was really simple to create, all the little tickets on the right hand side of the page are one image cut out of the "
Tickets" paper.
To create the centre strip I simply cut a long strip of tissue paper, it doesn't have to be straight, and then pleated it. I cut it in half and stuck it to the page using a very small amount of repro herma and then secured it properly using a line of machine stitching. Then I just added the other all the other elements around the tissue strip.
The photo has been matted on a piece of chipboard to add extra depth to the page, I wanted to add a bit of bling so have used some liquid pearls around the edge of the photo.
I hope you have enjoyed this post, we would love to see what you create using designs cut out of patterned paper, if you would like to share just leave a link to your blog or gallery and we will pop over and leave you a comment. If you have any questions about any of our creations or posts please ask away.
Check back in a few days time when Rachel Ward will be showing you what she has been up to.




.jpg)
.jpg)










