Tuesday 30 October 2012

Chipboard - adding dimension

Hi Tracy G here with my monthly blog post.
 I love to add layers and depth to my layouts, so this month I going to show you how I've used some of the sheets of chipboard from the shop to add a bit of dimension to my layouts, as well as using some of it to make an embellishment for a card.

For my first layout I used the chipboard to make frames for my photos. I simply cut 4 rectangles measuring 3.75"x5".  This was the ideal size for my frames as I had printed two photos on a 4"x6" with a border.
All the papers I've used on this page are from the Fancy Pants Designs - The Good Life 6 x 6 pad.
This is a very simple page which tells the story through the photos.


On my next layout I used the chipboard  to make dimensional embellishments, and also mounted my photo onto it, to add depth.
As this layout will eventually go into my Niece's wedding album, I felt  there wasn't really any need for a title.


 The hearts are cut with a die, once from chipboard and then from paper to cover the chipboard.


The circle was cut using a die, then coloured with ink and stamped on.


Finally I made this flower using the Tim Holtz - Tattered florals die,  which I coloured  with ink and added Liquid Pearls - Onyx Pearl to the centre. The butterfly was also cut using a die and painted with Liquid Pearls.


I hope I've inspired you to use some chipboard on your pages. As usual all the products I've used are linked at the bottom.


Monday 29 October 2012

Pink Paislee's City Sidewalks

I don't often buy Christmas collections. I struggle to get excited for Christmas in October, especially since we have a couple of birthdays to go through before December.

Until I saw the Pink Paislee's City Sidewalks collection.  I had to grab a few things, especially that Ephemera Pack and those tags!

I have made a mini album using Heidi Swapp Memory File Folders, ready to record our Christmas and the run up to the day.


I started with a this. 


I have used 2 of the smaller chipboard folders.  I decorated the spine with some patterned paper.  I also made 3 more folders out of Bazzill cardstock.  The leftover from the cardstock became some pockets to hold tags and additional journalling.  I have also used the PhotoSleeve Book from Heidi Swapp Memory File.  The shaped paper that the photo sleeves are stapled into didn't go with my scheme so I carefully remove the staples. I am also using some old Chrismas cards. You can see that I've used one here to decorate the outside of the Bazzill folder.


Next I cut out some pages for the inside.  I have used a mixture of patterned paper from City Sidewalks and also some older grid and journal papers. The pages are decorated with one or two stamps to bring them all together cohesively. I have also used the card from the packaging of the tags and ephemera pack as a page.  I simply covered the back with some grid paper.

I also decorated the cover of each folders.  I couldn't resist adding a shaker box, complete with snowflakes.  Shhs, the reindeer sneaked into my shaker box, all the way from Hobbycraft.


When all the pages are ready, I arranged them into the five folders. I also added some envelopes as pages, just in case I have a letter to Santa to write. The folders have been bound with 2 book rings but I think I need bigger rings.  Any idea where I can go to get larger than 2" book rings ?


Here it is all decorated and finished, ready for December. 


Are you buying any Christmas range this year ?  If so, what is your favourite range ?  Even if you are not buying, you might still have a favourite ? Do share.


Sunday 28 October 2012

~ UKScrappers Cybercrop Class ~


Members of the UKScrappers website will be aware that the 'Now we are ten! 10th Anniversary Cybercrop' is well underway right now.  There is a literary theme and, using a kit which Sarah and Lianne put together, I created a class for the event.  The kit features papers from the new 'Ready Set Go' range by Amy Tangerine, a card pocket, border stickers and sticker sheets.  

The class focuses on techniques and effects using punches and making a simple minibook, perfect for tucking away in the card pocket. 


More information, including the instructions, can be found here (as far as I know, you need to be logged in as a member in order to download them: if you aren't already a member, you can easily sign up on the homepage) and there are still some kits, featuring everything that you will need to create your own version of  the class page, available here in the shop if you'd like to purchase one to make your layout.  

I'm looking forward to seeing everyone's interpretations of the layout!


Thursday 25 October 2012

The Good Life

Hi all Jen G here. This month I used Fancy Pants Designs “The Good Life.” I chose to work with the 6x6 paper pad, the Sticker Fundamentals, the 12 inch sticker strips and the chipboard/hand dyed buttons.


For my first page I caught the sunburst bug! In recent months Jen, Helen and Tracy have all inspired us with sunburst designs, but I hadn’t given it a go yet. I had also seen on Pinterest some layouts featuring sunbursts. So I put all of this inspiration to use here. I drew a sunburst onto a sheet from the 6x6 pad and cut it out. After discarding the sections I did not want to use, I folded the remaining sections in half lengthways. I secured these down to a second sheet of 6x6 in the corner only. Then I applied Tombo glue to the inside of each fold and added WOW glitter in red. When this was dry and attached to the base cardstock I placed the photo over it with foam pads. This all created a 3D effect, making it pop off the page and draw the eye to that super cute face in the photo! I added some more glitter splatters, buttons and word stickers from the collection in the corner as if they had escaped from that sunburst. I usually always journal on my layouts as it’s so important to record the who, what, where and why, but this time the photo actually says it all already.


For my next page I had no plan what so ever! Helen was here and we were having a scrapping day. I picked up one of the star buttons and decided to replicate its shape in patterned paper. I just used a ruler and pencil and copied the shape of the button.  Once I had done that the page just kind of happened by itself. We gossiped and ate cake and I pushed bits around on the page. Sometimes that leads to frustration – am I right? But sometimes it works. I added some more of my favourite red WOW glitter, some of my beloved DIY Thickers and finally the journaling.
For my next page I decided to step away from the red. I do love red in my layouts. “The Good Life” range does feature red, but it also has a selection of papers without any red. I chose to focus on the soft yellows and blues and added some of the grey buttons from the range. I also used one of the 12 inch sticker strips along the top and bottom of the page with some Amy Tangerine washi tape.

For the title I used a second 12 inch sticker. I cut it into smaller sections and arrannged them to make the word “ALL”. I then faux stitched around the edges to make them look a little more like alpha stickers. I added the rest of the title using the tiny letter stickers on the Fundamentals sheet.

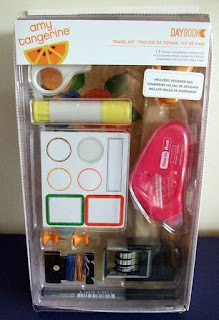
After I had completed these three pages I thought my blog work was finished for this month, but our lovely Sarah and Lianne had other ideas! We got together recently for some scrapping time and they challenged me to do one more page “on the go”. They gave me one of the new Amy Tangerine “Ready Set Go” Daybook Travel Kit.
The manufacturers picture is kind of hard to make out just what is in this kit so I have opened it up just for you, our lovely readers. 

There is an adhesive roller; a glue stick; a stapler; a slick writer a pair of scissors; a self inking date stamp; some journalling stickers; a needle and some thread; a couple of decorative pins and a cute little bag to put them all in! This is a picture of the bag with everything inside in as well as a 6x6 paper pad.

The the page I created I also used some Adorn It mini alphas and some thickers – both of which fit in the bag also, although I did cut the thicker sheets down to fit in.

So, imagining that was all I had with me I created this page:
I used the adhesive; the needle and thread; the stapler; the date stamp and the mini journalling stickers from the travel kit plus the extra thickers, alphabets and some 6x6 papers that I put in the bag myself. It was so easy to put together a page with just the contents of the kit. There is even enough room in the bag for one of the Amy Tangerine Day Books so if you were really short on space you could have absolutely everything you needed in one cute little bag!
How do you scrap on the go? What are your essential “must-have” products?

Tuesday 23 October 2012

* * Finding perfect Project Life Products * *

Hello all

It's Laura here and today I want to share with you my process of collecting my weekly stash for my Project Life pages and to highlight some of the products at Sarah's Cards that are just perfect for Project Life.   (Confused by Project Life? - Its a year long scrapbooking project designed by Becky Higgins, check it out here)
 I am a very busy working (full time) Mum to a one year old.  My scraptime is very precious but I always prioritise my project life album as I love the record of our daily lives that it is building up.  But that doesn't stop me shopping for stash... I thought I would share with you my top tips for Project Life stash shopping. 

Firstly 12x12 papers... I look out for a few things, firstly bold repeating patterns that can be cut into large pieces to be used for background elements.  This month I love the Midway range by October Afternoon, check out those gorgeous stars! 

This is also my first step when constructing my weekly project life pages, I create a few background pieces that I can build upon.
The other great 12x12 papers to look out for are ones that have pre-designed journalling cards printed onto the sheet.  My Little Shoebox have a sheet in all of their latest releases! All can be found here. 

These papers are great for quickly cutting up into ready made journalling cards, and they fit perfectly into 3x4 pockets, helping to make your designs really quick and easy!
 And lastly, 12x12 papers that can be cut up and used as embellishments.  These two sheets from Midway by October Afternoon caught my eye this month!
So... my my stash shopping mirrors my project life process quite well.  I start to build up a little collection of 6x4 background pieces, some 3x4 journalling pieces and then some paper embellishments that I have cut from larger 12x12 papers.
Once I have this basic stash collection sorted I like to add a few more bits into my stash.  Each week I try to limit my project life collection into a tiny mirco amount of stash.  Otherwise I just waste too much time searching for the "perfect thing" and I need my scrapping to be quick.  So once I have gathered my paper pieces I check my stash for a few more elements. 

I normally grab a couple of small letter alphabets, this week its a pink MLS and the gorgeous Amy Tan letters.  Plus some label stickers and diecuts, matched with a couple of rolls of washi tape
Right... once I have my stash collection sorted, I can start shopping.  I have already sorted my photos for this week, a handful of 4x4 instagrams, some 6x4s and a couple of bits of paper tokens that I collected from the week.  Lets scrap....
 I start by deciding where all my background pieces will go and then I start "assigning" some of my cut out elements to each of those pieces, as you can see some of my pockets are completely filled with photographs too.  This was a bit of a quiet week for us so in the weeks lacking in "big events" or lots of photos I include lots of journalling and use the quiet weeks as an opportunity to tell some of our more everyday stories.
So once I have got a rough idea of where everything is going I start to add my embellishments, stickers and of course some lettering. 
 I work on each little pocket at a time and my aim is to keep everything as simple as possible (whilst trying to keep it looking cute of course! This pocket shows quite a dull photo... me at work one morning but the journalling documents one of my overwhelming feelings from this week and that was BUSY.  I am so busy at work, its crazy and overwhelming right now and that needed to be included in my week.
 So I keep going until every pocket is filled.  Sorry for the badly lit photos, these evenings drawing in have really caught up with me.  This week I have highlighted the difficulties we faced with no childcare, nap times, achievements my daughter has made and some family time.
I need to add a couple of tiny elements to this but for now my week is done.  I hope I have inspired you to look at some different stash for your project life pages this week.


Sunday 21 October 2012

Bags Galore!

Hi, Vanessa here. Have you seen the new See Me Sew bag kits by My Mind's Eye? As soon as I saw Sarah's Cards stock them, I just had to make one for my blog post.

Sewing is a new passion for me (in addition to scrapbooking) but finding the time to fit it in around work, kids, the house and of course some social time, can be a bit difficult.  However, I thought these little bags were perfect to get me going and into the swing of it.  I chose the Ruffle Bag, mainly because I haven't done any ruffling!! :)  Firstly, here is the finished product :-


The bags come with one sheet of fabric, with all the pieces sectioned out ready to cut, so there is no measuring to do (phew!). All the instructions are printed out on the inside of the cardboard packaging. I'm going to go through these instructions, with photos of each step.

Step 1

The first step is simply, opening out your fabric piece, setting the instructions to one side.  Then, iron on the reverse side (just so you don't get any marks on - or you could iron on the right side, but put a piece of thin scrap fabric over the top).  Then, cut out all your pieces.  Each piece is given a label, which for ease, you can pin to each piece so you don't forget which is which.

Step 2

The first pieces of the bag to put together are the handles.  Fold them in half (lengthways), so the right sides are facing together on the inside.  You don't have to iron, but I prefer to.  Then, Stitch along each long side of the handles and turn the right side round.  Iron them again so they are flat.  Finally, topstitch along both long sides of each handle and put them to one side.

Step 3

For step 3, you sew the front and back panels together, but only down one side.  Place one panel on top of eachother, the right sides facing and sew down one side.  Backstitch at each end to secure the stitching.  Then open out and iron the seam open.  Take the 3 ruffle pieces and fold each of them in half lengthwise (wrong sides facing together), iron flat and hand stitch a running stitch along the top raw edge of each one, very loosely.  Pull the threads at each end to ruffle the fabric.  Evenly space the ruffles as much as you can and pin in place from one side of fabric to the other (across the width of the bag).

Stitch the ruffles in place overlapping eachother.  The bottom ruffle should be approximately 5 inches (12.5 cms)  from the bottom of the fabric and the top ruffle should be lined up exactly with the top edge of the bag panel.  Stitch in place and then pull out the thread used to make the ruffle.

 Step 4

Fold the bag panels back over, right sides facing and stitch along the bottom edge and the other side - leaving the top of the bag unstitched.

To create the boxed bottom of the bag, keeping it turned inside out (this is the most tricky part of the bag) for each bottom corner, line the side seam up with the bottom seam, creating a point as per the photo above, measure 1.5 inches (3.7 cms) and mark a line.  Stitch along this line (backstitiching at each end to secure) and then trim, leaving 1/4 inch allowance (1/2 cm). 

Step 5

Nearly there, I love this part, you can really see it coming together.  Turn the bag right side out and pin the handles to each side, front and back.  lining up the raw edges of the bag with the raw edges of the handles.  They should be placed about 1.5 inches (3.7 cms) from each side of the bag.  Pin in place.  Turn the bag inside out again.

Sew the lining pieces together in the same way as the main bag, but without the ruffles, i.e. down each side of the panels (right sides together) and along the bottom.  However, leave a 3 inch (7.5 cms) gap on one of the sides - back stitch at each end to secure.

Create the boxed bottom in exactly the same way as the main bag.  Turn the lining piece right side out.  Then, place the lining piece inside the main bag, as above so the right sides of each part are facing eachother.

Step 6

The last step is to stitch all the way round the top of the bag.  Then, from the gap in the lining pull the whole bag through and using a slip stitch (which I need a lot more practice doing!!) close the gap in the lining.  Push the lining inside the bag and give it an iron.  Finally, top stitch all round the top of the bag, approximately 1/4 inch (1/2 cm) from the top of the bag.

The last bit is to simply layer the pieces of the flower on top of eachother and sew into place.  Pin it on your bag and you are now FINISHED.

Now you have your gorgeous little tote bag.  Enjoy and thanks for looking :)

Vanessa xx