Tuesday, 12 February 2013

Just going with the flow.

Hi folks. Jen G here again. I'm going to be up to my eyes in electricians and decorators for the rest of the month so I'm squeezing in an early post now.
Just before all of the lovely new CHA releases arrived I ordered a Fancy Pants collection pack of the "Hopscotch" range. It was a range I hadn't really paid attention to before, but I'm glad I spotted it as I found it quite easy to use. I had no plans when I started putting any of these pages together, I just "went with the flow". I like to scrap quickly and simply - so I did. Along with the Fancy Pants papers I used some Simple Stories "Snap" stickers and Bakers Twine on each page.

For the first page I had two 6x4 photos that I wanted to scrap on one page together. Being an A4 scrapper that didn't leave much room for anything else! I trimmed the photo on the left slightly then embellished straight onto it with the word stickers from the "Hopscotch" pack as well as some from the "Snap" range. By positioning the raised circles and the main title at triangular points with those word stickers, my eye is drawn to that cheeky smile of Josh's - a good thing to be drawn to in my honest (totally unbiased) opinion.


On this second page I only had a small 4x4ish Instagram photo to use. I decided to cut the photo into 3 sections then I mimicked that in the strips of patterned paper. Those thin lines of the yellow paper intersecting the photo help to keep the focus on yet another gorgeous boy (see I'm still unbiased.) James himself asked me to use the title "so cool".

The third page is quite girly for me, but since I am on the photo I can be forgiven for the pink and the flowers. Yet again I have kept it simple, but those papers are so pretty I wanted to let them be seen. The "live, laugh, love" banner came in the "Hopscotch" collection pack - it fits this page perfectly.
I hope you like the pages I've shared today. Don't forget to leave us links to your latest work in the comments section or on our Facebook page.

Sunday, 10 February 2013

February Sketch Challenge

Hello lovely ladies.  It is Ifa with you, bringing this month's sketch challenge. The winner will receive a £20 e-voucher to spend in the shop

I have to confess to being not very good at coming up with a sketch.  I think it is to do with the fact that I don't use too many layers of patterned paper thus making the resulting sketch a bit bare looking. But in the line of duty, I have come up with this sketch for you.

 
Helen has taken inspiration inspiration from the 3 photos and scattered elements from the sketch. Her boys look adorable in their school photos. 
 
 
Tracy has scrapped about the her trip to Amsterdam. Amsterdam is one of my favourite city to visit. I adore the little photos of Amsterdam, they really draw me in and make me want to read the details even more.


Next up we have Louise's layout about her boys visit  to Legoland at the Trafford Centre. They looked like they had so much fun.  I love the coloured spots that Louise decorated the page with, really reminded me of Lego bricks. I never owned any Lego in my youth and wished I had opportunity such as this, imagining what I could have built if I had this many Lego bricks at my disposal.

 
Lastly, I am sharing a layout about my own trip to Paris, Christmas shopping.  We spent a long time on Champs Elysees.

 
I hope you are all inspired to give this sketch a go.  Please link up your entries using the Link Tool below. Don't forget, there is a £20 e-voucher for you if your layout is picked as the winning entry. I can't wait to see your layouts.

Friday, 8 February 2013

Washi, washi and even more washi...


I seem to have a bit of a problem with washi tape.  I can't stop buying it.  So many pretty patterns on those cute little rolls!  I know that some people just love patterned paper but for me, my obsession is tape.

So when I saw that the new tubes of tapes from My Mind's Eye had arrived in the shop, I couldn't resist.

I find it so much more adaptable than paper.  It's repositionable.  It can be crumpled up and unrolled yet still will look brand new.  It can be punched.  It's both pretty and an adhesive.  You can write on it.  The list goes on...

So for my pages this month I wanted to show a number of different ways in which it can be used.

Layout one:
For my first layout, I was inspired by the tapes in the tube.  I decided to create a background using strips of the tapes in the order in which they were stacked in the tube.


I also wanted to explore ways in which to use the tapes for actually sticking things down so I experimented with using it to stick two 6x4 photos together along the left hand side so that they open up like a card (more detailed photos for this technique are included later with lyout two).


As I'd made a section of the layout which is openable, I also made a little tag with which to open the photos up.


I attached a loop of yellow tape to the bottom of the top photograph and then punched a heart through both layers.


I then opened the tape back up.


The next step was to stick a small piece of a contrasting coloured tape inside.


I then closed the looped tape back up again.


This allows the photos to be lifted open.

Now for the final touch of washi on this page, I have my daughter to thank.  When she looked at what I'd done, she pointed out that when the photo card was open, the back of the photograph wasn't very attractive.  Using strips of the yellow tapes from the tube, I covered up the back of the photograph to tie it in with the yellow photo mat.


The completed page which tells the story of our camping trip to the Gower Peninsula last August:


View one (photo card closed)


View two (photo card open to reveal photo underneath)

Layout two:
I continued to find ways to use washi tape to add a a number of photos to my page.  I love using Instagram to share photos and had a selection of pictures from a recent snowy walk that my husband and I enjoyed together.  After printing and cutting out 3 square photos, I lined them up in the order in which I wanted them to appear to tell the story.


I then picked out an aqua tape and stuck strips along the edges of each photo to stick them together.


I folded them to create a concertina.  This pile of folded photos was stuck down onto my page and held closed with a phototurn.

Another way in which I regularly use washi tape is to add a border to my pages.  The repositionable qualities of washi mean that it is very easy to create a neat mitred corner with it.


Stick strips down to the edge of the page.


Gently lift up both overlapping strips and cut across the diagonal from outside to inside corner.


Stick back down again and you should have a perfect mitred join.


The finished page where I also used small strips of tape as a design feature to make it look like I'd stuck the elements down with it: 


I hope I've given you some ideas for how to use tapes on your pages.  If you have any ideas to share then leave a comment or link for us either here or on our facebook page.


My supplies:


My Mind's Eye - Decorative Tape Set - Red & Turquoise

My Mind's Eye - Decorative Tape Set - Yellow & Grey

My Mind's Eye - Boy Crazy - Decorative Tape


Wednesday, 6 February 2013

***January Sketch Challenge WINNER***

Thank you to everyone who took part in our sketch challenge for January. The entries are all fantastic and the design team had a very difficult task of choosing the winner.

We have, however, selected a fabby layout by Ali Parris, we love the big heart and striking colours :-


Congratulations Ali!  Please email lianne@sarahscardsltd.com to claim your £20 e-voucher.

Don't forget to check out the next challenge on 10th February!


Monday, 4 February 2013

Cartoon crazy


Hi everyone, Tracie here!
I have always loved cartoons, I find it fascinating how an artist can take an image of someone, simplify it and yet at the same time exaggerate it to create their likeness. It's a talent I have always both admired and envied.
I wanted to bring something of that style into my layouts.
For my first page I wanted to create a simple 'story board' - unfortunately the photos I'd chosen, that I'd been meaning to scrap for a long time, didn't really tell much of a story. I was able to get around this by using some of the Echo Park element stickers, to note key points.


It has often been remarked upon that I may have a bit of a potteries accent, and this is what this second layout focuses on.
We have a regular cartoon strip in our local paper (The Sentinel)  by the hugely talented cartoonist Dave Follows, which is written entirely in the Potteries dialect. I shamelessly copied one of these to use on my layout leaving the heads of the characters off so I could replace them with photos of me and my other half!


and finally, for my last layout, I handcut a simple mask to recreate the planet in the photograph, I then punched out a few stars, and with the simple addition of some October afternoon tidbits, my layout was complete!


If you've got any cartoon layouts you'd like to share with us, we'd love to see them!


Saturday, 2 February 2013

Valentine Shmalentine!

Valentine's Day is a non event in this house, passing by without a hint of heart or flower. For this reason I usually steer well clear of Valentine themed papers. However when I saw the Secret Crush Collection by Pink Paislee and the XOXO Collection by American Crafts I just knew I wanted to use them. I added in a few sheets of Studio Calico papers from various collections, to break up the 'pinkness' with a bit of blue and teal.
I also bought 3 rolls of decorative tape, choosing a couple of pink striped and black striped. This Stencil alphabet by Fancy Pants also caught my eye as did these element stickers by Pink Paislee.

The first LO I have to share is of my 3 boys in their Christmas outfits, I created 3 patterned paper pillars and placed them in the same height order as the boys are in the photo. The stark white of the card was taken away with a light mist of teal, and a few splatters of pink lemonade.
I hand cut 3 heart frames from pink patterned paper, edging with grey ink  for definition. I love that the decorative tapes are semi transparent so they can be layered over each other.
The little pink heart was cut from the heart patterned paper.
My second LO is very different as I concentrated mainly on the blues and greens, using the grey and pink papers minimally.
Here you can see that I used the black striped tape over the grey spotty paper... I love how this looks.
One of the cut off strips from a sheet of patterned paper had some very cute doodled arrows. My original plan was to cut out the arrows to use on my LO, but I decided to hand draw one around the cut out heart instead. The white gel pens from Ranger are perfect as they have a lovely opaque paint finish.
I punched the my dear element from patterned paper using a large scallop punch, and hand cut the speech bubbles to layer up.
On my last couple of LOs I decided to keep the stark white back ground and really try to embrace the 'pinkness'. I though I would find this really difficult scrapping boys, but I have to say I loved the final results.

On this LO of Drew and I, I created a strip of photos in Picasa choosing a black border. I kept the LO really simple, using just a couple of strips of paper to mat the photo strip, and using tapes to add further detail.
I like the white on white look, but in this case the title sticker became lost on the LO. I decided to stitch around it using 3 strands of embroidery floss. I poked the holes all the way around the title first, which made it a lot easier to sew.

A little bit of torn tape helped to ground the title so it wasn't just floating around at the top of the page.
You can see here, that I've overlapped two tapes again. With the huge amount of tapes available in the shop, the possibilities for this techniques are endless.
I used the bracket stickers to frame the last photo on the strip. You have to be really careful with these stickers as they are VERY sticky. once they're down they do not want to come back up!
In the top corner I used the American Crafts Knockout Border Punch System. This is a really clever way to have a number of punches that take up very little space
My final LO is my favourite. I took this photo of Harry to create his thank you cards for his birthday party. It's probably my favourite photo of him ever.
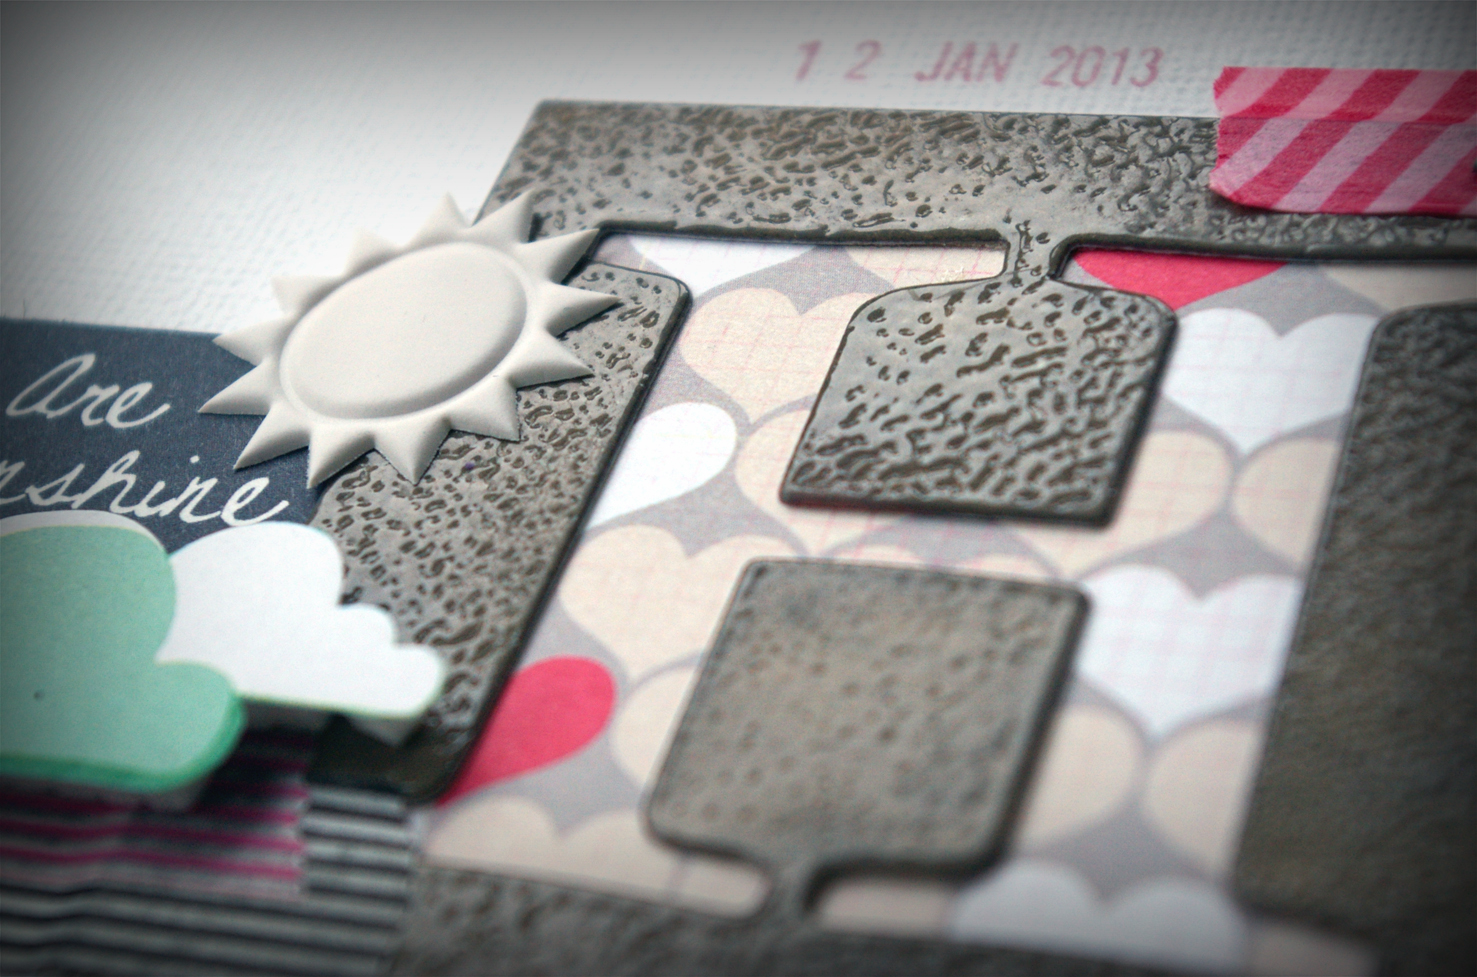
I inked the stencil monogram with grey ink and heat embossed with clear powder. This was then backed with the heart paper, and layered with tape, hand cut clouds, a sentiment cut from patterned paper and a sun sticker.
At the top of the page a cloud sticker was layered over a hand cut one.
A few hand cut hearts and some tiny sentiments were cut from the Pink Paislee collection papers and added under the photo.
 
I hope I have inspired you to look at Valentine themed papers with fresh eyes. You don't have to be a hopeless romantic to use them, and they are not just for scrapping photos of girls. Leave us a link to your work in the comments box so we can see how you have used the love themed collections.
Make sure you call back every few days to see what the rest of the team have created.