Showing posts with label Travel. Show all posts

Tuesday, 25 October 2011

* * More travel layouts using Boarding Pass * *

Hello again, it's still Laura here with day two of travel layouts using the gorgeous "Boarding Pass" range from October Afternoon.

First up another excuse to scrap a handful of New York photos... this time four 2.5 x 2.5 photos.  I always use photobox for ordering my prints as I think the quality is fantastic and I love the quick service.  I also love to use Picasa to create collages of photos to upload to Picasa to enable me to get the size photos that I am after.  In this case I created a grid of these four photos in Picasa and then ordered the collage as a 5 x5 print, enabling me to cut them down into the perfect 2.5 inch squares.

I am so not a fan of measuring my patterned paper and totally tend to go for the "eyeballing" approach when it comes to patterned paper size selection.  I find that this helps me to work quickly and suits my style of scrapping.  So for this layout I chopped several strips of patterned paper of various widths and lengths. 

I added these to the middle of a 12 x 12 sheet of white cardstock and then my photos were added ontop.
For this layout I added some details by labelling each of the four photos that I was scrapping.  My trusted American Craft Precion Pen came out I wrote out a couple of journalling boxes.  It's easiest to write your title/journalling first and then add a box around your writing and then cut out.  This saves you trying to squeeze your writing into a box that you have alreday drawn.

Again with this layout, I then added details to my layers by finding little gaps that I could add some word stickers and a couple of bling stones

The title was made up of these thickers and some mini market alpha stickers.  The thickers were given some extra details with a pen and the whole title was layered on a piece of patterned paper that was raised up from the page using 3d foam pads.
oh and you can see that another button and some ribbon have also sneeked their way in there! They were both from the Miscellany pack that I showed you yesterday but you can also get a whole pack of matching buttons if they are your favourite embellishment!

Third and finally for me... a change of location for this layout as now we are in Paris.  One of the things I love about the "New York" piece of patterned paper in this collection is that it comes with loads of ready made titles! If you have been to the place in question that is!

Luckily for me... Paris was the destination for our 'mini-moon' the weekend directly after our wedding.  So I started to create my layout using this title cut from the "New York" sheet of paper, alongside a 5x5 photograph and a selection of 2x2 patterned paper squares.

Onto each of these squares I added small amounts of details using the die cut shapes from the Miscellany pack and stickers from both the word and label sticker sheets. 


To keep the page from looking too flat, some of these stickers were stuck directly onto the patterned paper squares and some were raised up slightly using 3d foam pads.

Some ribbon, mini market alphabet stickers and hand journalling also found their way onto this layout and meant that I could add some very brief 'key fact' journalling!
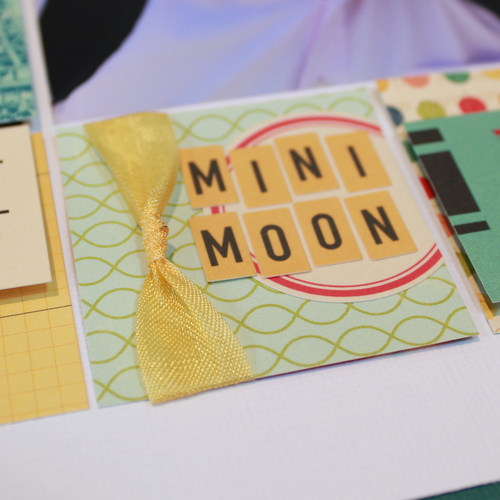

I felt that the whole layout needed to be mounted onto a piece of coloured cardstock to add a border to the whole page.  So I trimmed a little off the sides and mounted the whole layout onto a co-ordinating colour.

A quick layout that is fantastic for using up your scraps and those odd stickers that you have left over on a sheet.

Monday, 24 October 2011

* * Travel themed layouts with October Afternoon * *

Hello all, it's Laura here with some October Afternoon goodies for you today.  This month I have been catching up on scrapping some honeymoon photos using the travel inspired range "Boarding Pass" by October Afternoon.

I was drawn to this collection by something new from October Afternoon and that was their pack of "Miscellany" which is essentially a multi pack of die cut shapes, chipboard, tickets etc all designed to co-ordinate with the patterned papers of Boarding Pass.

I am going to show you three layouts that I made with this collection and how I used the goodies in this pack to add interest and detail to my pages.

Firstly... my favourite die cut of the bunch was this... a cute old fashioned viewing dial.  I didn't realise that this came in the pack but I was pleased to discover that my thumbnail pics that came with my Photobox order were the perfect size to add some tiny photos to this embellishment. 
So once I had that assembled I moved onto my layout, this one about our honeymoon in New York, over a year ago now.  (insert wistful memories) I used two photos for this layout, a larger one overlapped with a 6x4 with a white border.  I always make a habit of ordering some of my photos with a white border to give me something to different to work with every now and again.

The background are large pieces of patterned paper, in this case, they are "Venice", "Tokyo" and
"Berlin"


I then used elements from the Miscelleny pack to build up some layers and interest on top of this base.  In order to add dimension I inked the edges of some pieces, I distressed the edges of some, some pieces I crumpled up in my hand then uncrumpled and stuck down. 

Label stickers and Mini Market alphabet stickers were perfect for continuing to add details on other parts of my page.  As the page was starting to look a little busy I decided to journal right on top of my photo and fit my journalling around my page title.  I always use American Crafts Precision Pens and find that they write really smoothly on photos.... just make sure you give your journalling a couple of minutes drying time before you move on with your scrapping.

Now for the final touches of detail... the October Afternoon word stickers are the perfect size for adding into your layers as you near the end of your layout.  I find little gaps to add them in, inbetween patterened paper layers and on top of photos, sometimes adding in some handwritten journalling too. 

I ripped and distressed a couple of my elements a little more at this stage and sewed on the buttons that came with the Miscelleny pack.  

And very finally.... just a few hand stitches added with embroidery floss and then some ink splatters added with spray inks.  There are three gorgeous colours that come with the Boarding Pass range.

Plus a little ribbon added at the bottom and thickers on top of my patterned paper title!

Ok.. but that's it... finished! I love to add lots of details to my page and layers and stickers are all part of my obsession.  My advice to you would be to stick down as you go along!!! Don't try to create the whole layout and then remove it all and work backwards.  This never works for me.  I like to stick and go.  So create your base... stick... next... photos... stick... then start to add your layers and details around what you have already committed to.  The final details will then naturally fit in at the end.

Tomorrow - Two more travel inspired layouts!


