Saturday, 17 November 2012

Freedom Scrapping!

I'll admit I am not one to jump on a bandwagon of any kind, and it can take me a while to get my head around any current trends in all aspects of my life - I think there's a little part of me deep inside that like to be different; whether it's a form of rebellion or pure stubbornness I don't know!

One such scrapbooking trend that has passed me by is the week by week/month by month multi-sized scrapping in a single, pocketed protector. I think it looks absolutely fabulous and I love the work I see by all the talented scrapbookers out there, and the idea of having a detailed photographic account of daily life is so cool for the future - but it's just not for me at the moment. I scrapbook in a nature that I can only affectionately refer to as "shambolically" ( I scrap whatever I fancy whenever inspiration grabs me, it could be an old photo of a special occasion from when I was a child, or a mobile shot that I snapped the day before) which perfectly suits the limited time I have to enjoy my hobby. And to paraphrase a famous scrapbooker from across the pond, I'm ok with that. I just go with it.

Unfortunately for me though, sitting back from this trend does mean that I'm less inclined to look at products which are designed with this style of memory preservation in mind, as I pressume they won't work with "what I do".........so it's just as well that, being an Echo Park fan, I decided to check out their brand new Photo Freedom range, and I was really excited by what I saw! The 12x12 sheets are primarily intended for multi-sized scrapping projects, with their designs split into journaling cards that are perfectly sized for that method. But I was drawn to the beautiful colours and patterns of two of the releases, and we all know I can't refuse a nice bit of patterned paper, so I snapped some up and set about working with them - A4 style!

Here's is my first page, using products from the "Today's Story" release:
Using a piece of grey chevron paper as my base (don't forget you can find links to all the products in the shop at the end of the post!),  I set about utilising a single sheet from the range to provide all the other colour and pattern I needed.

First, the bright, geometric "Love" journaling card made the perfect anchor for my design to flow from, and with a sticker from the amazing value-for-money matching Elements Sheet (the 12x12 sheets are absolutely jam packed with really useful stickers and elements and costs just £2.99!!) layered on top, provided a title:
Next, I used a selection of other journaling cards from the same sheet to cut pretty hexagons to use as a mat for my photo. I added interest to them by cutting away/adding heart shapes to them, and adding a doodled border to give them all a uniform feel.
A further journaling card from the sheet, decorated with ampersands, provided a perfect base for a note of who was in the pic and a little embellishment cluster.

The very generous Element sheet was laden with stickers that I found hard to choose from - I have loads left, including tags, arrows and alphas that are super useable and I'm looking forward to popping them on future pages. You can see here how I made a little cluster at the top of my page using a few:
and here how a couple were the perfect match for each other to add a bit of interest to what was just a random silly photo:

For my second page - I decided to see how far I could push the Elements stickers from the "Happy Moments" range.....would I, a patterned paper addict, be able to create a page I loved using mainly stickers?!

This time a sheet from Lily Bee's Persnickety formed my base, and a journaling card from the "Moments" 12x12 sheet helped form my title, along with some of the cute alphas from the stickers sheet.
I used lots of stickers to form my compulsory embellishment cluster - pretty border stickers were chopped down to size in place of patterned paper, and given the doodling treatment before being adorned with photo corners, arrows, starburst stickers layered together to make a flower, and a couple of washi flags!
To the right, more stickers from the sheet provided a date, and some of the fab speech bubble stickers made ideal spots for my journaling.
I popped a pretty frame sticker in the bottom corner of my page, and filled it with more from the sheet, layering them with 3D foam to add a bit of depth and interest.
Again, I used doodling around my page and around the elements to bring them all together.

I have lots of stash left over after making these two pages - I was really surprised and pleased at how far the supplies went, even when used in a "traditional scrapbooking" manner. The colours and patterns of designs also work easily with other things I already own so I'll look forward to mixing these in on future projects. Both pages also came together really quickly too by my usual standards; and even limiting myself to just one 12x12 sheet and the elements stickers from each range still gave me plenty of scope to create a page without wasting time scrabbling around for extra supplies.

So, whether you're a Project Lifer, a Document 2012er or an "old fashioned" scrapper like myself - be sure to check out the Photo Freedom ranges and see how they could be incorporated into the way you preserve your memories :)


Tuesday, 13 November 2012

{Feeling festive}

The Christmas season is starting to come upon us now, and it has taken me a while to embrace it this year, but I feel ready now to fully accept the festivities! I tend not to scrap Christmas photos straight away - usually by the time I've uploaded and sorted through them all, and then got some printed, it's mid-February and I'm well and truely fed up of winter and ready for spring! So come November, I dig out the christmas photos from the year before and get scrapping. This month I've been working with one of my current favourite manufacturers - Simple Stories. They make great collections that are full of both 12x12" papers and cut apart designs, and they've also released books of journalling cards in both 4x6" and 2x3" sizes. These products are great for the split page protector style of scrapbooking that has become so popular, and you can bet I'll be using some of these in my project life book later this year, but I wanted to also show how they can be used on traditional full sized layouts too.

Simple Stories Handmade Holiday Collection

First up I went back two years to my son's first Christmas. We had a lovely day with the family, and I was able to get this wonderful group photo of all four generations together. I had an enlargement printed at 12x5" so that it was the entire width of the page - I love getting this size sometimes, it makes a great change from the standard print sizes and is fantastic for panorama style photos.  I layered up journalling cards, paper strips and stickers above and below the photo, overlapping some elements onto the photo itself to bring everything together. One thing I love about digital photos is that one print is not the only one we can ever have, so you can experiment with sticking stuff directly to it, and it's not the end of the world if the photo gets ruined.


This second page also features pictures from 2010, and tells the story of my little boy's christmas stocking. That year his grandma, my mum, made him an 'advent calendar' of gifts - one for each day in December leading up to Christmas. On Christmas Eve the most special gift was brought out - a stocking handmade just for him. Father Christmas certainly delivered, and filled it full of goodies to enjoy! He was only two and a half months old, but he took it all in, watching everything around him. Stockings are an important tradition in our house, and I love that he has his own special one right from his first Christmas.


For my third page this month I jumped forward a year and scrapped a photo from 2011. I like to do this with supplies, so that I don't have a bunch of pages all together in my (chronological) albums that are matching. I like them to be diferent! This photo was the one we chose to send out to friends and relatives with our cards last year. It was one of many photos from this mini home photoshoot, but one of only a couple that were any good! He may look sweet and innocent here but in fact he was not very happy about being put in a santa hat! I'm not sure how things will go this year on that front - he's much more active, but he now loves hats, so we may have more success, we'll have to see.
I love the picture so I printed it big - this isn't far from A4 size, and was printed at home on my own printer. The big "Merry and Bright" title piece comes from one of the cut apart sheets, and is 4x4" - perfect for a bold statement on a page. 


 Thanks for stopping by, and do feel free to share your own festive pages - we'd love to see!


Sunday, 11 November 2012

Sketch Challenge

Yes, it's challenge time again! Here is this month's sketch for you to create with!
All you have to do to be in with a chance to win a £20 e-voucher, to spend in the shop, is to create a layout using the sketch and add a link to your work so we can all have a look! Can't wait to see what you all come up with!


and here's what the team have been up to to inspire you!

Jen has flipped the sketch and used some lego to make this amazing layout!


Claire has used junior prom photos of her beautiful daughter for her layout


This is Vanessa's striking layout; the neutral shades really make that stunning photo stand out! 


Nat swapped the journalling for a third photo in her beautiful layout


and finally, Tracie used 'mock-up' photos of herself and her other half for her 'tongue-in-cheek' page


Thursday, 8 November 2012

Back to school... in more than one way


For about a year, I have been meaning to do a blog post about handwriting but never got round to it. I've been asked a few times to show how I do my handwriting and inspired by this sheet of Studio Calico paper, I decided to finally do it.


I love to handwrite on my layouts.  It's quick and it's personal.  I have heard a lot of people comment though that they don't like to write on their pages because they don't like the way that their handwriting looks and because of this, don't want to spoil the page.

As a primary school teacher, one of the things that I teach is handwriting.  A few years ago, the school that I was working at brought in a new handwriting scheme.  I was lucky, as the style of cursive script that they introduced was exactly the same style that I was taught to use when I was at school.  For many of the other staff though, it meant them having to re-learn how to write.  I know from the many conversations that Jen G and I share about education, that her school has just started to teach cursive script across their school and she is currently having to teach herself to write in this way too.  So, it is quite possible to change your handwriting style, even as an adult.

The principles behind this style are simple: every single letter starts on the line with an entry stroke and finishes with an exit stroke, ready to join to the next letter.


This type of paper is great for practising handwriting.  The solid black line is for writing on and, in this case, starting every letter from.  The dashed blue line is the mid point where the top of letters such as 'a' and 'e' will be and the dashed red lines show the highest and lowest points where the tails of letters such as 'g' and 't' will go to (ascenders and descenders).


 Here is how the individual letters look in this style:


How the letters look when joined together:


Here are some example layouts that contain my handwritten journaling.  The Yearbook range from Studio Calico mixed with Elle's Studio tags were perfect for some back to school pages for my biggest two children (yes, it's November and I've only just got round to scrapping these pictures!).  Ledger and graph papers along with the alphabet sheets made ideal backgrounds for my school layouts.

Oliver started school in September.  I can't believe that he's now at 'big school' as he's only just four: where does the time go?!  This page documents the build up to starting school using a photo taken before we left home for his very first day at school.


This page includes my favourite photo from our little photoshoot before we set off for school.  The picture really demonstrates the relationship between Evie and Oliver.  He looks up to his big sister so much and she really looks out for him.  That day marked Evie moving into Year 2 and Oliver starting in the Reception class: new beginnings for both of them.

On the first page, I used a ruler to draw lines to write on and on the 2nd page, I wrote on directly onto the lines on the background sheet.


I also added some more hand written information about the classes that they are both in:


I feel that I must point out that I'm by no means saying that my handwriting is perfect or that this is the only and best way to write but it's just the method that I use and teach.  If you'd like to change your style or you print and would like to join, then this is one method to have a go at.

However, I would also like to add that your handwriting is a very personal and precious thing and whether you like the look of it or not, it is still something worth preserving.  We have a tiny notebook full of recipes that my Mother-in-Law handwrote for my husband when he went to university.  It's about the only example we have now of her handwriting and it feels very comforting to look at and something that we'll treasure and share with the children when they're older to give them a glimpse of their Granny.  

I hope to see you hand writing your journaling!


My products:


Tuesday, 6 November 2012

And we have a winner....

Did you enter our October sketch challenge?
The design team have been admiring all your entries and have picked their winner.
Well done Tracee Provis for your wonderful entry.


The design team love how you have made your photograph a focal point with the overlay and lovely fresh colours of your layout.
Please email lianne@sarahscardsltd.com to claim your £20 e-voucher.

Sunday, 4 November 2012

Breaking the rules

Since I first started scrapbooking I have heard lots of talk about the 'rules' of creating a layout. Like most people I think rules are a good thing, but occasionally they are meant to be broken!

The comment I hear time and time again from my non-scrapbooking friends is 'I couldn't do that' - I always tell them the same thing 'There is no right or wrong way to scrapbook, if you're preserving your memories and enjoying doing it, then you're doing it right!' I actually think I can hear some of you recoiling in the background now!!

I realise it's not a popular train of thought - but it's easy to get bogged down by the rights and wrongs and lose sight of the importance of recording something of note for future generations.

So I'm throwing out a challenge to everyone, tear up the rule book for a while and see what happens.

For my first layout I committed the ultimate sin of not using a title. I always struggle with titles at the best of times but I included all the relevent information and the fantastic Authentique curiosity range provided lots of key phrases to make an actual title redundant


For my second layout I mixed three different manufacturers, although it's great to have a lot of the work taken out of a project by having matching ranges it's sometimes fun to mix things up a little, I know a lot of you do this already but I thought it would be interesting to see how many different ranges I could fit onto a page. Also I wanted to create a vintage page without going down the usual lace and ephemera route, just because your photo is vintage doesn't mean you can't take a modern approach with your layout.


And lastly, I know that photos are better grouped in odd numbers, but what if I have four photos I want to use? Ok the obvious answer would be to do two layouts and split the photos into a one and a three, but I wanted to prove that you can use an even number and still make it work


I'm in no way saying that we shouldn't follow certain rules in scrapbooking, they are there to help us create something asthetically pleasing, but, especially for those who are new to this wonderful hobby, I want to say don't get bogged down by guidelines, just enjoy what you're doing!
 I actually have two rules that I live by that I won't compromise 'Buy copious amounts of stash and USE it!!'

I used the following products:


Friday, 2 November 2012

Almost there!!!

It's Louise here with a couple of LOs to share. After ordering the Authentique Curiosity collection with the intention of scrapping photos of the boys at the beginning of a new school year, I decided to be a little bit selfish and make the post an 'it's all about me' one.

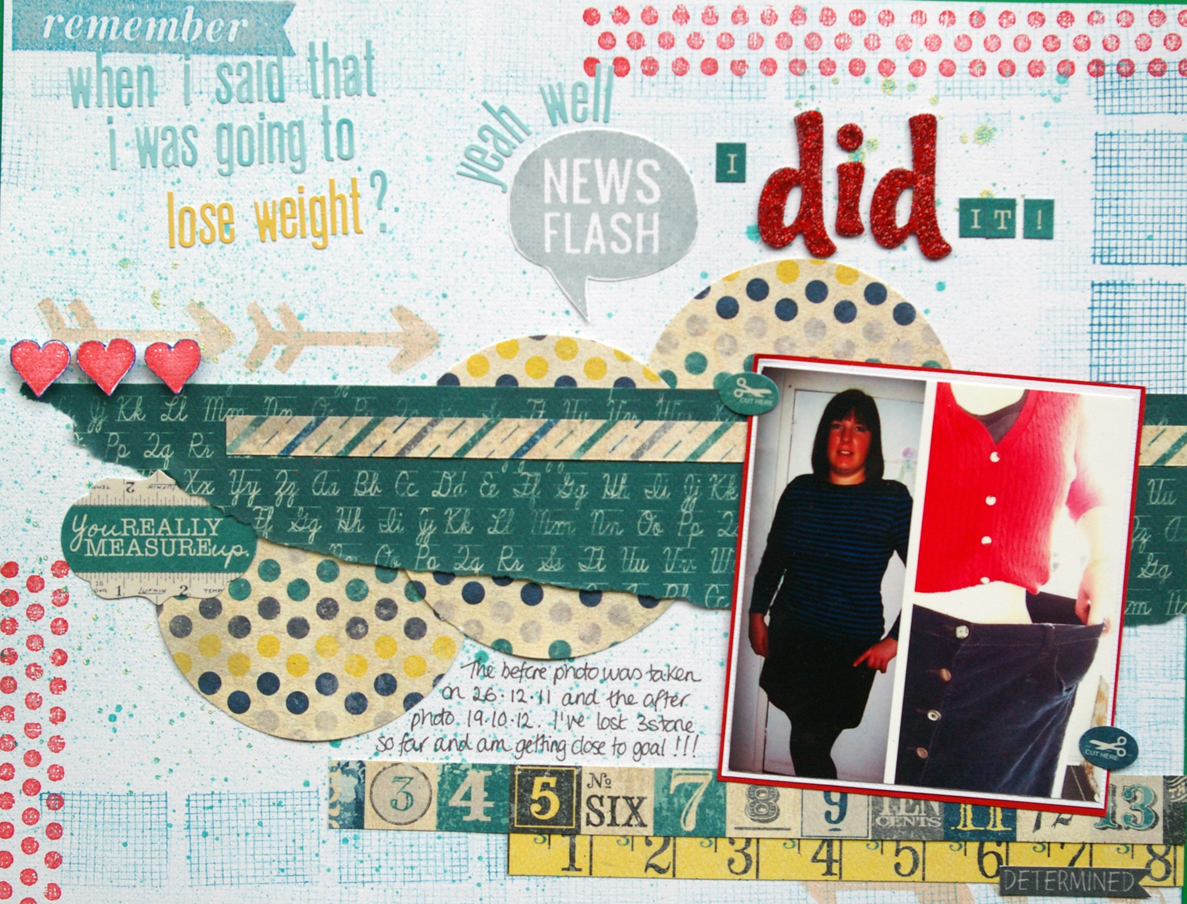
I don't know if you can remember my January post about my New Year Resolution to lose weight. Well after a rocky start, I'm finally well on my way to getting to my goal weight. I think that deserves a whoop whoop!
On the first LO I have to share, I included my 'before' photo that I used on the LO in my January post. I made it into a photo collage with a recent photo of me taken wearing the same skirt. Which is now so big that it falls straight down. I think that deserves another whoop whoop... lol!

I used white card as my base and an assortment of stamps to create a background A light misting with turquoise stopped it looking too stark.
I used a mix of small alpha stickers, DIY thickers covered in fine red glitter and a couple of stamps from the Pink Paislee set to create my title.
 

I added a bit of journalling to the LO to record the fact that whilst I've done well, losing 3 stone, I  have still got a little way to go until I reach my final target.

One of the things I've loved the most about losing weight is being able to buy new clothes, and more importantly the type of clothes I've never been able to wear before.
A group of friends went out for a night on the town to celebrate a birthday, and I bought a new LBD! I ordered 2 sizes and tried the largest on first and it was way too big... I'm feeling another whoop whoop coming on!
This photo was taken in the dress, and although you can't see a lot of it, you can see that it exposes skin, and I now have collar bones!!! And I'm much more confident about having my photo taken with my thin friends.
I used the stamps to add key words to the background, and love the way the black ink has bled slightly into the white acrylic paint brushed over the background paper.
After tying a bow with baker's twine, I stamped and embossed a couple  of stars and added them to the ends of the twine.
This little heart in a speech bubble stamp is so sweet and is perfect to cover the hole on the tag.
I have a couple more LOs celebrating my achievements which are still in the development stage. I plan to share these with you next month. I'd love to see how you record your own personal achievements, or how you have used scrap booking to inspire and motivate you into reaching your goals. Drop us a link to your blog or gallery in the comments box so we can swing by and have a look.
Remember to drop by every couple of days to see what the rest of the DT have been up to.