Friday, 8 June 2012

In stitches...


Back in my teens, the first craft that I discovered was Cross Stitching.  I still have part-finished designs which I have spent hours and hours working on and now that I feel guilty about not finishing: maybe one day!  I think the reason why I like Scrapbooking so much is that after just a short burst of creativity, you have a finished product.  I still love sewing though and try to find ways to incorporate both machine and hand-stitching into my layouts (I also have a huge box of threads that need using up too!)  I often stick to sewing a frame around a page or adding some small details or lines and so decided that I'd like to explore some other ways in which to include sewing on scrapbook layouts.

1. Handsewn titles

a) Number Outlines:
 
This effect could be created in a couple of ways, for instance, using chipboard or number stickers but in order to get the exact size and font that I wanted, I cut out a card template using my Craft Robo.  I then placed these in position on my layout using some temporary adhesive to keep them in place.


Using a paper piercer, I pricked holes all around the edge of the numbers at equal intervals:


I then sewed a running stitch, using some brown twine, in one direction following the holes and then sewed back again to fill in the gaps.

This is my completed page where you get an idea of the size and impact of this large sewn title:


b) Cursive Script Words and Phrases:

To create this sewn title, I typed my selected phrase into MS Word using 'Prelude FLF' font.  I printed it in a few different sizes so that I could choose the one with the best fit (80pt in this case).  I then laid the paper down on my page and pierced along the printed letters at regular intervals.


I repeated this in different positions on the page before backstitching along the words using 3 strands from the skein so the finished effect wouldn't be too bulky.  


I chose three different shades of pink which matched the Crate patterned paper that I had picked for this page, which I made for our wedding anniversary which we celebrated earlier this week.
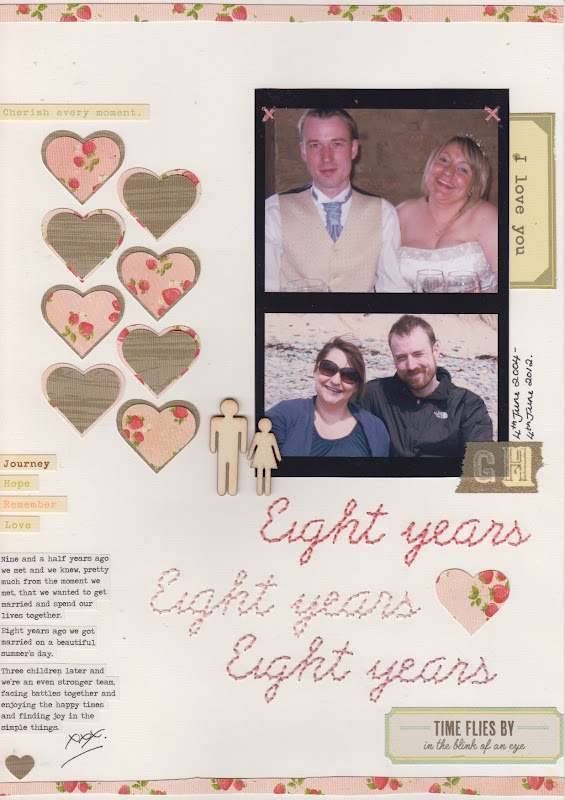


2. Embroidered details

a) Cross Stitch embellishments:

One feature I often use on my pages is to add small cross stitches.  On this page I placed a couple at the top corner of the photograph: 


 b) Sampler stitches:

I first learnt to sew at primary school where we used to make samplers decorated with different embroidery stitches.  I wondered if I could translate this idea onto a scrapbook page and this following page was born.

I used a piece of grid paper by Studio Calico to replace gridded fabric like aida or the binca that we used at school.  This meant that I could pierce holes at equal points to sew through, to create patterns.


My first row was a simple running stitch and from there, I added some further decorative stitches:


 I also added a triangle of cross stitches on the photo section:


The finished layout:


 c) Heart embellishment:

For my final page, I used an idea that I had seen on Pinterest for making a piece of wall art.  I'd ordered a piece of the Studio Calico map paper for the reverse pattern but then realised that the map covered Brittany, which is one of my favourite places, and decided to make a layout all about that.  

I glued all of the papers/elements into place before placing a chipboard sheet over the map and piercing holes around the inside of the shape:


Using 3 strands of red floss, I backstitched around the outline:


The finished page:


Apart from the sewing, there are also some common elements running through each of these layouts: the use of the wood veneer shapes, washi tape embellishments and strips of patterned paper forming borders at the top and bottome of the pages.

I hope that I've given you a few ideas to add some texture and interest to your layouts.  We'd love to see your pages using handstitching: leave a link here or on our Facebook page.


My products:


Monday, 4 June 2012

Frame it!

I love frames! There are times when I am struggling to complete a layout and a frame can be all it needs to balance it properly.
When I saw the Amy Tangerine papers from American Crafts that were awash with frames I knew I had to have them, all of them!! The colours and patterns were just so lush I couldn't wait to play!
For the first layout I cut out all the little frames and layered them on my page raising the photo with 3d foam pads to give it a focal point.
This photo of my granddaughter bending into the wind is so cute and the colours worked perfectly with these papers

For the second layout I cut out the large frame and then gutted the centre, trimming it to give a border so that when it was mounted onto black cardstock it gave it more definition. The adorable little clouds here were perfect for the theme, and the cute little doodled borders, when cut out, were ideal to use as strips for the journalling.
The title seems to be rather appropriate at the moment with the poor weather we've had this weekend.

The photo had quite a bit going on in the background, so rather than edit it in photoshop I decided to doodle around it instead, creating yet another frame.

and finally, for the third layout I cut out one of the larger frames and cut it in half, positioning it to make a
more abstract frame,

                                    
the funky flowers worked well for boys or girls layouts because they're not too girly.


I hope you are all enjoying your bank holiday/ Jubilee weekend and that the weather hasn't put too much of a dampener (if you'll excuse the pun!) on your celebrations!

I used the following products:
American crafts Amy Tangerine sketchbook papers
Doodle dimensional stickers
Jenni Bowlin torn border stamp
Amy Tangerine alphas


Saturday, 2 June 2012

Yeeehaw!!!

Hello it's Louise here with 3 LOs created using the October Afternoon, Sasparilla collection. As soon as I saw this fun collection I knew I had at least 1 photo that it would be absolutely perfect for. This got me thinking about themed papers and how sometimes they can be disregarded because you don't scrap about that theme/don't have boys etc.
I have created a LO that was 100% on theme with the paper range. Another LO that was loosely related to the collection, and another that was nothing to do with the cowboy theme.

A couple of years ago my sons school had a dress up day, and he decided to go as a cowboy. I took this photo of him and it has been waiting to be scrapped ever since. I decided to throw as much cowboy at the page as possible, and used lots of the details from the Miscellany Pack .

This chipboard sheriff badge has been coated in 3 layers of brown sugar Zing embossing powder. After heating each layer I added another sprinkling of powder, this gives a lovely smooth and glossy finish.
 I created a lasso with some gardening twine. I coiled it up and stuck it in place using Tombo glue.
 At the top of my page I created a pocket for my journalling. I used a journal card to make the pocket and used a circle punch to  create a half circle opening before machine stitching round 3 sides directly onto the backing paper. Another Journal card was trimmed to size, and had an eyelet attached to make it into a tag, and slipped into place in the pocket. A length of baker's twine was added to the tag and secured in place to a button.
 My second LO is very loosely linked to the cowboy theme. My friend and I went o see Steps when they came to Manchester and she snapped these photos throughout the evening. You can see me joining in with the dance moves to 5,6,7,8...
 I used a mix of tiny alphas to create the sub title, which is a lyric from a Steps song.

My last LO has nothing to do with the cowboy theme and was created to record the adventures Drew gets up to with his best friend.
I used a sheet of the dark kraft from American Crafts as a base. Those who know me know I cannot waste card and paper and have to gut everything within an inch of its life. The strip of kraft was passed through a ribbler, and stuck horizontally across the page. I then layered up the various elements on to op of this.
 The honeycomb overlay was cut to shape before it was stuck in place.
From a strip of wood grain paper I cut some small chevrons. Chevrons are big in scrapping at the moment and this is a fun and easy way to use up scraps of paper and create eye catching detail.

 I hope you like what you see, and will look at themed collections with new eyes. If you use the Sasparilla range, please leave a link to your work, we always love to see what our customers do.
Hope you all enjoy the Jubilee weekend.