Wednesday 28 July 2010

Goals

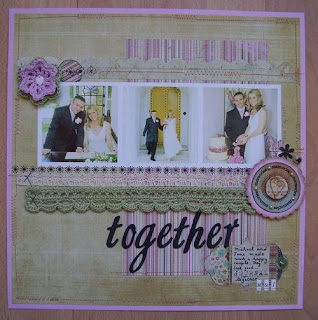
Here is the second layout that Nat has created using Bella Blvd Estate Sale papers.

"A couple of years ago I made a page documenting the things I wanted to achieve in my lifetime. Having been through a few major life changes in the past two years and having just graduated and qualified as a teacher, it felt time to readdress my "little list" of hopes and dreams and document these as they stand now. I recorded them on a little secret journalling tag that pulls out from underneath my photo."

Have you seen the shop website has been updated with the next six months kits? All the details are here.

Monday 26 July 2010

Estate Sale

This week on the blog we are going to be featuring some stunning pages created by Nat using the Bella Blvd Estate Sale range.

"I had so many pictures from this special night that I wanted to include I decided to create a photomontage in my photoediting software. As all the pictures were of varying sizes and orientations, even arranging them as best I could left some gaps in my design. Once generally happy, I printed off my montage, and solved the white gaps by sticking patterned paper in those spaces."

Don't forget the July sketch challenge, all the details can be found here. You still have a few weeks to have a go and be in with a chance of winning.

Thursday 22 July 2010

Amazing!

Some of you may remember a website called TV Weekly, which posted scrapbooking/crafting video tutorials and instructions every Friday. This site doesn’t exist anymore, however, one of the tutorials was for a little maze book, which I’ve done again here using papers from the Man of the House range by Bella Blvd. I’ve also used a piece of pom pom trim for the ribbon tie. However, I have cut off all the pom poms and glued them in different places around the book to decorate.
Starting with a 12 x 12 inch piece of cardstock, fold in half, and then fold each edge back to the centre so your card resembles a “W” – as in the photograph below.
Open the cardstock back up, turn it around (not over) and do the same in the opposite direction – open it out and you should have a piece of card with sixteen squares measuring approximately 3 x 3 inches.
Using a ruler and craft knife, cut down along the right vertical fold – do not start at the very top of the card – start at the bottom of the top square and cut all the way down to the end of the card. Do another cut – exactly the same along the left vertical fold and then a third cut down the middle fold, but on the third one, start at the top edge of the card and cut down to the top of the bottom square – not all the way to the edge of the card. See the photograph below for how your card should look.
Then, you fold the card, following the folds of the maze you created to construct your pages.
For the outer cover, use two pieces of chipboard (or thick layers of card) cut to 3.25 x 3.25 inches and cover one side with wet PVA. Place this adhesive side down onto your choice of patterned paper (cut to 4.25 x 4.25 inches). Cut the corners of the patterned paper – but not right up to the corner edge of the chipboard. Using your wet glue, squeeze a line along the edge of the chipboard and fold the overlapping paper onto the inside. Do the same with the opposite flap, then fold the little overhanging flap of paper at each corner – do the same for the remaining two flaps and then repeat on the second piece of chipboard.
Lay the two outer book covers side by side, about 0.5 of an inch apart and run a line of glue horizontally across the centre of each cover and lay your choice of ribbon over the line of glue, leaving plenty of length so you can tie a bow to close the book.Using the end pages of your concertinaed pages, glue each end onto the inside of each outer cover.
Now decorate your pages.


If you have a go at making this maze book we would love to see your creations, just pop a link to your book in the comments. Have fun.

Vanessa.

Wednesday 21 July 2010

Keep Calm!

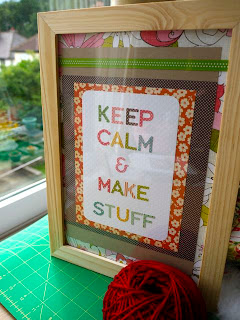
I keep seeing these signs popping up lately and thought they were really good, I thought this one really summed me up and would look great on my craft room wall. I bought a cheap frame and have used a mixture of October Afternoon Fly a Kite and Crate Papers Paperdoll ranges. There are lots of phrases that you could use, how about "Keep calm and just keep going" or "Keep calm and crochet".
Rachel

Thursday 15 July 2010

July Sketch Challenge

So who is up for another challenge? Lou Collins has created a great sketch for us this month and the design team have had fun using it. All you have to do is create a layout or card using the sketch and either post a link to it in the comments box or email it across to us at sarah@sarahscardsltd.com by the 9th August. The winner will recieve a £10 e-voucher and be able to join the design team in creating an example page for the September challenge.
This month we have been joined by Karen who has produced this gorgeous layout using the cutest photos.
Lou Collins

Lou

Rachel

Gems

Rachael

Jen
We are really looking forward to seeing how you interpret Lou's sketch, hope you enjoy the challenge!

Giveaway Winner!

We've enlisted the help of Random.org to pick a winner for our HUGE Echo Park giveaway, and the winner is..


geekygirl!

Congratulations geekygirl! Send an e-mail to lianne@sarahscardsltd.com to claim your prize and we'll get it sent out to you.

Huge thanks to you all for taking part - it's almost CHA time, and who knows, maybe they'll be more giveaways on the way soon!

Wednesday 14 July 2010

Sketch Challenge Winner

It is time again to announce the winner of the sketch challenge that we set in June, as always we had some fantastic enteries and it was great to see so many different interpretations of Jen's sketch.
Our winner this month is Mandy with her stunning wedding layout, we all loved the crochet flower and trim. Congratulations Mandy, if you drop us a line we will get your £10 e-voucher over to you and give you details of the challenge for August.

Keep checking back to see which lucky scrapper has won the gorgeous Echo Park papers.

Friday 9 July 2010

Echo Park Giveaway!!!

Do you love the new releases from Echo Park? Would you like some? For free?! If so, we have a huge Echo Park Giveaway for you.

Echo Park Paper very kindly donated the Sweet Summertime range for a blog giveaway, and we have decided to throw in the new A Walk in the Park collection for a bumper giveaway prize. One lucky winner will receive one sheet of each of the Sweet Summertime and Walk in the Park collections PLUS an elements sticker sheet and alpha sticker sheet for each range - that's 24 sheets of paper and 4 12x12 sticker sheets!
All you need to do is leave a comment below before midnight Sunday and we will randomly draw a winner on Monday.
Good luck!

Thursday 8 July 2010

Happy Summer

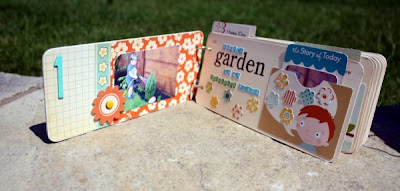
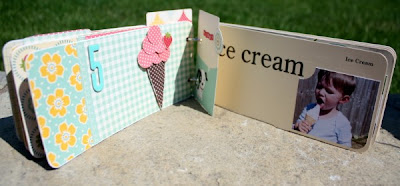
Have you seen the new October Afternoon flashcard books? Did you wonder how you could use it? Cathy has created this stunning mini book using the flash cards.

You Will Need........
October Afternoon Fly A Kite papers and embellishments.
Fly a Kite flashcard book.
Thickers
Extras needed - Glue stick (I find this best for using on mini albums)
Extra strong double sided tape or similar
3D foam
Emery board for sanding

The front cover - I cut the green check paper to 2 thirds of the size of the chipboard and the circle paper to the remainder, I then placed a journal card just off centre before placing my title. I split the rub-on sentiment 'happy summer days' so I could use part of it with my title, I then distressed a strip of paper before pleating it & adhering with glue dots.

Next I cut the papers to the size of the pages - just enough for the left hand side of the book. I then chose some journaling cards and used extra strong double sided tape on the sides and bottom to create pockets. I used a 1" circle punch to take out sections of the pockets/cards and some of my photo's. I used some of the cards as extra pages for my journalling - using a hole punch to duplicate the holes already in the pages.


To create the ice-cream cornet I cut a triangle and punched six 1/2" circles, then arranged these until I was happy with the look and topped it off with a strawberry, I used 3D foam to raise it off the page.


One each page I incorperated the title into my journaling.
Don't forget you still have a few more days to enter our sketch challenge, you could be in with the chance to win a £10 e-voucher and the opportunity to create an example layout with the design team for the August challenge. Just post a link to your page in the comments box or email your layout over to Sarah at sarah@sarahscardsltd.com.

Tuesday 6 July 2010

Wishful Thinking

To continue our theme of home decor I have created this little canvas using some Fancy Pants Wishful Thinking papers.

You will need....

1 small canvas
1 sheet of cardstock
Hambly mini graph overlay
Fancy Pants Wishful Thinking papers
Aunty Sarahs Dew Drops
Martha Stewart Butterfly Punches-classic and monarch
Woodware circle punch
Teal American Crafts embossing powder
Lily Bee Lovely chipboard
Kraft
Adhesive pearls
Ribbon

How to .....

Cut a piece of cardstock which is slightly smaller than your canvas, ink the edges and glue into place. I have inked the edges of all of my papers on this project.

Cover your canvas with a piece of your Hambly overlay, don't stick it down yet.


Cut out a frame from your patterned paper, stick the overlay down only adding the glue to the areas which will be hidden by the frame.


Add a square of kraft to the centre of your frame.

Cut out a scalloped circle and stick it into the centre of the kraft.

Cut out a large circle that will fit onto the scalloped shape allowing just the very edge to show, add one of the Lily Bee Lovely chipboard shapes on top.

Punch out a large monarch butterfly and a classic butterfly, apply embossing powder all over the small classic butterfly and to the tips of the larger one. Layer the two up and secure them on top of the chipboard shape.

Take a short length of ribbon and divide one end into two, stick the ribbon to the centre of the butterfly allowing the divided end to hand down. Add some adhesive pearls to form the body of the butterfly.
Punch some small circles out of the papers that you have used on your canvas and stick them around your frame adding a few dew drops to finish off.
I hope you enjoy having a go at this little class.

Sunday 4 July 2010

Fancy Pants Metal Frame

These are so much fun to make and really simple - There is a template included to fill the frame so there is no measuring! I cut a scrap of paper to size and stuck it in place, I then added a rub on flower. The whole area was then covered with glossy accents, once dry I added a second layer and whilst it was tacky I popped a gem in the centre, I finished off hanging the little frame on a piece of velvet ribbon - hey presto, finished!!! I'm going to tie this onto my scrapping tote - because it matches (of course lol) but they would look lovely anywhere - even hanging on a vase!

You will need....

Fancy pants metal frame 1, 2 or 3.
Glossy Accents
October Afternoon, Fly A Kite Rub Ons
Bling
Ribbon


Cathy
xx

Thursday 1 July 2010

Homemade

We thougth it would be good to have a go at something a little different from the usual 12x12 layouts, extending our love of paper crafts to home decor. Cathy is starting us off with this gorgeous picture.

You will need...
October Afternoon fly a kite papers
Fancy Pants Artist edition frame
Emery board
Dauber paints OR paints
Glue Stick
Scrap of ribbon
Small heart doillie
Paper Mache frame OR any frame with a deep apperture would do. (mine is 10" x 10")
Foam pads

How To...
1. I stared off by using the reverse of 'Lemonade' paper to cover the edges of the frame, I then cut the 'Front Porch' paper into strips before placing this on top of it, making sure that I centred it matching it on both sides top and bottom. I put it to one side to dry.
2. I then took the 'Homemade' word from the Thickers pack, because these have a shiny coating & I wanted it red I used an emery board to sand off the coating before painting it red, I also decided to do the same thing to the 'Love' but did this orange. I did 2 coats on each.
3. I then took the Fancy Pants Artist metal frame and painted it in aqua on both sides.When the frame was dry I sanded the whole thing with a rough emery board making sure that some of the top layer of paper came off in parts so as to get an aged effect. I dusted it off with an old paintbrush because I didn't want the dust to interfere with the rest of my sticking down!!
4. With the reverse of the 'Ice cream' paper I measured & cut it to the size of the apperture of the frame before using glue stick to stick it in place, I then cut thin strips of the reverse of the 'Front Porch' paper to go around the inside edge.
5. I placed a small heart shaped doillie to the back & the banner sticker across the frame corners, a journal card & a mini bingo card behind my photo arrangement.
6. Then using 3 layers of 3D foam tape squares I placed the 'Love' before fixing the metal frame down (using very strong glue - Tombow Multi) I sanded the fancy edge with my emery board to reveal the metal.
7. I then 3D foam 'Homemade' on top of the frame.
8. The little chipboard houses are from my stash - I think they are Maya Rd? I just covered these with small scraps of paper, sanded the edges & mounted with 3D foam, on the bottom right corner I just covered a scrap piece of chipboard, added a rub-on & some OA mini market letter stickers. I wanted to add a little something extra so just punched out 2 circles before topping them off with a rub-on butterfly & again using 3D foam I fixed it beside the mini bingo card. I tied a bow before sticking it to the metal frame link.


We have another couple of projects to share with you over the next week so don't forget to pop back and see what we have been up to.